Connecting an Identity Provider (IdP)
This document provides a comprehensive guide on how to register a new issuer by connecting an Identity Provider (IdP) within the AGNTCY Identity Service. Connecting an IdP is a crucial step for integrating external authentication and authorization services, such as Client Credentials, with your AGNTCY Identity Service environment. This guide specifically details the process for configuring different Identity Providers, including Duo and Ory.
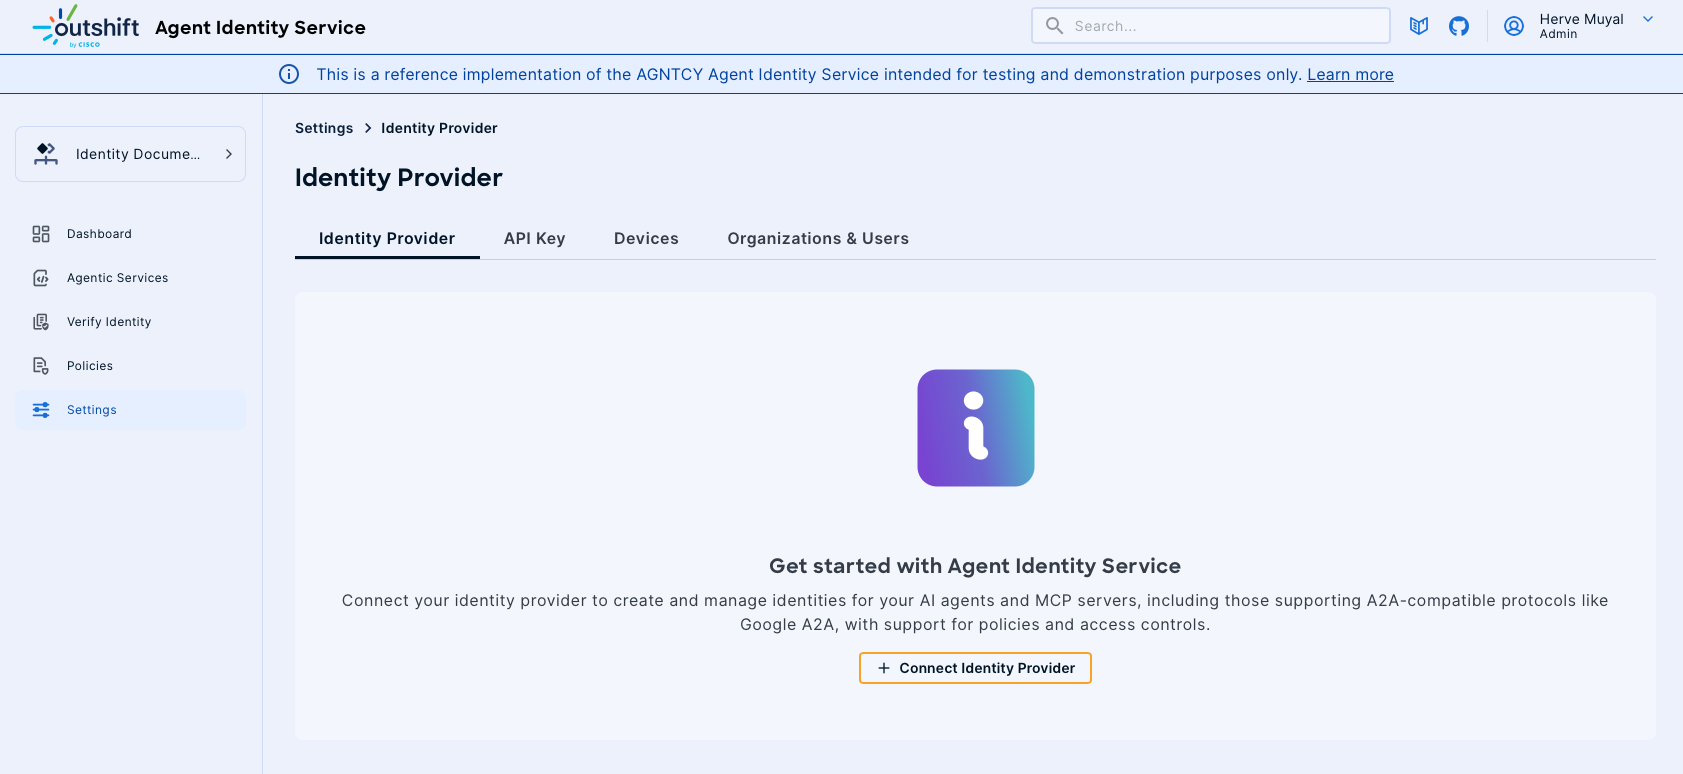
To access the Identity Provider creation page within the AGNTCY Identity Service:
- From the main dashboard, locate and click on Settings in the left-hand navigation menu.
- Within the Settings section, select Identity Provider.
- On the Identity Provider management page, click the Connect button to initiate the creation wizard.
This will direct you to the "Identity Provider Connection" page, where you can begin configuring your new IdP.
Now proceed to the next section for detailed instructions for each supported Identity Provider.
Connecting Duo as an Identity Provider
This guide specifically details the process for configuring Duo as an Identity Provider.
Prerequisites
Before you begin the Identity Provider connection process, ensure you have the following:
- Access to AGNTCY Identity Service: You must have an administrator role or sufficient permissions within the AGNTCY Identity Service application to access the Settings and connect Identity Providers.
- Duo Security Account: An active Duo Security account is required.
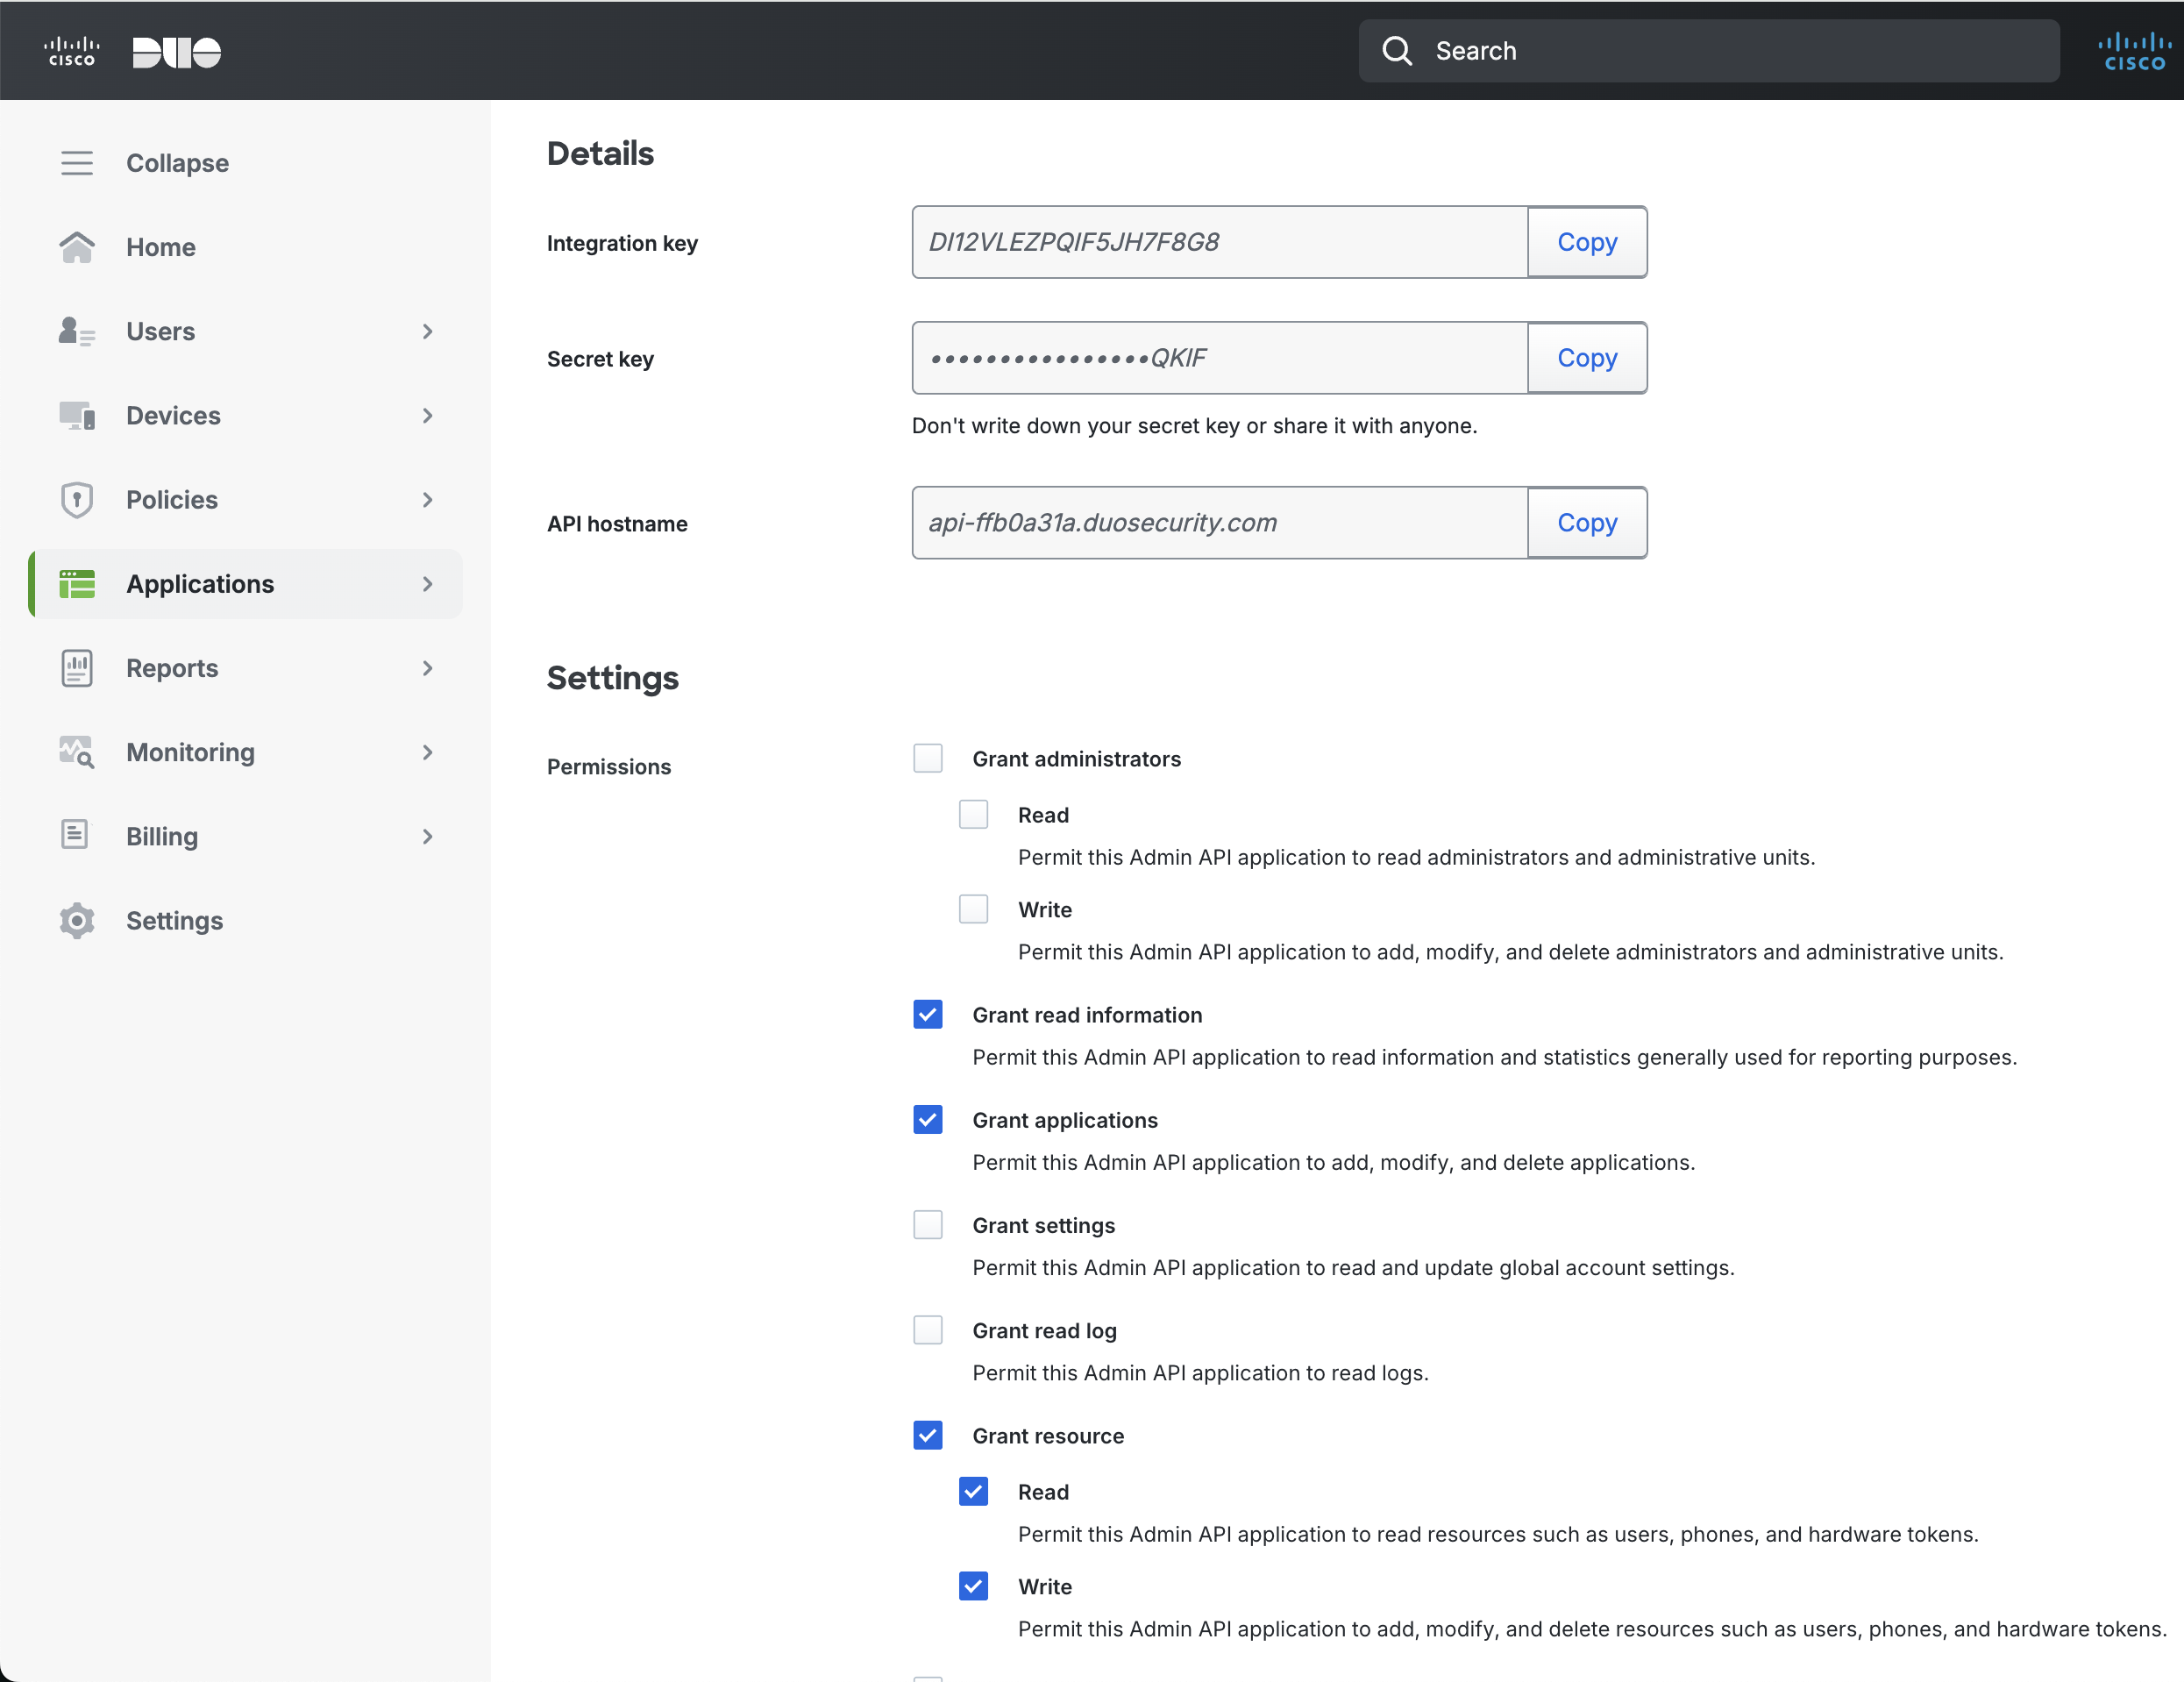
- Duo Application Details: You must have an existing Duo application configured within your Duo Admin Panel. From this application, you will need to retrieve:
- Your Duo API Hostname
- The Integration Key for your Duo application
- The Secret Key for your Duo application
You can follow the Duo Admin API documentation for detailed instructions on how to create and manage applications within Duo Security.
Below you can find a screenshot of the Duo Admin API interface, with all the necessary permissions and the necessary fields for your integration.
Identity Provider Connection Steps
Follow these steps to configure and register your Identity Provider:
-
Select Identity Provider:
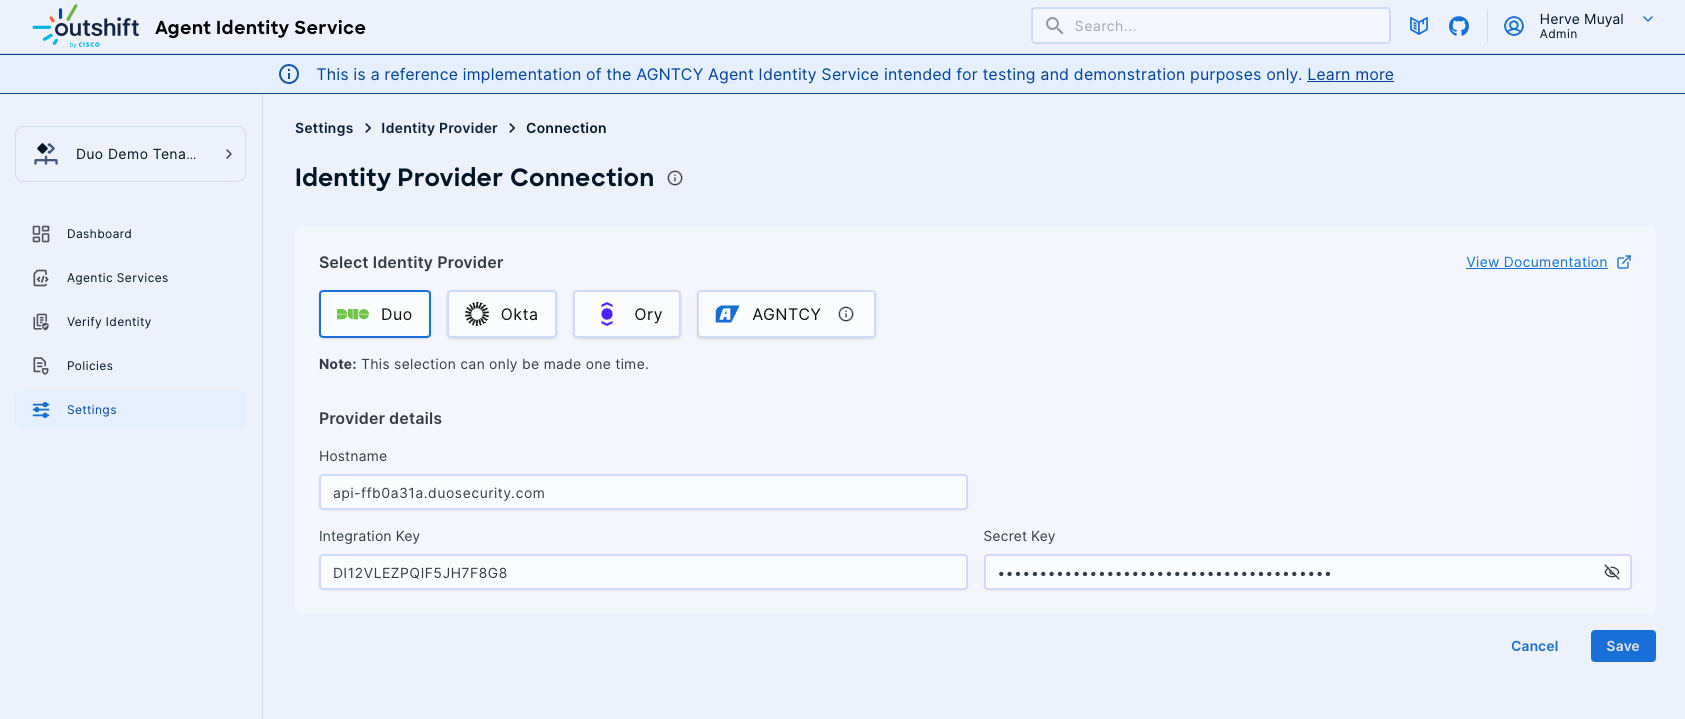
- On the "Identity Provider Connection" page, you will be presented with a selection of supported Identity Providers.
- Carefully choose the provider you intend to integrate:
- Duo (as shown in the example, for Duo Security integration)
- Critical Note: The selection of an Identity Provider is a one-time action. Once saved, this choice cannot be modified later. Ensure you select the correct provider before proceeding.
-
Enter Provider Details:
- After selecting your desired Identity Provider (e.g., Duo), the "Provider details" section will become active, prompting you for specific configuration parameters.
- Hostname: Enter the API hostname for your Duo Security account. This is your unique Duo API endpoint.
- Example:
api-ffb0a31a.duosecurity.com
- Example:
- Integration Key: Input the Integration Key. This key uniquely identifies your application within Duo Security and is obtained from your Duo Admin Panel when you create or configure an application.
- Example:
DI12VLEZPQIF5JH7F8G8
- Example:
- Secret Key: Provide the Secret Key. This is a sensitive credential used for cryptographic signing of requests to the Duo API, ensuring the authenticity and integrity of communications. It is also obtained from your Duo Admin Panel. For security purposes, the input in this field will be masked (displayed as asterisks).
-
Save Configuration:
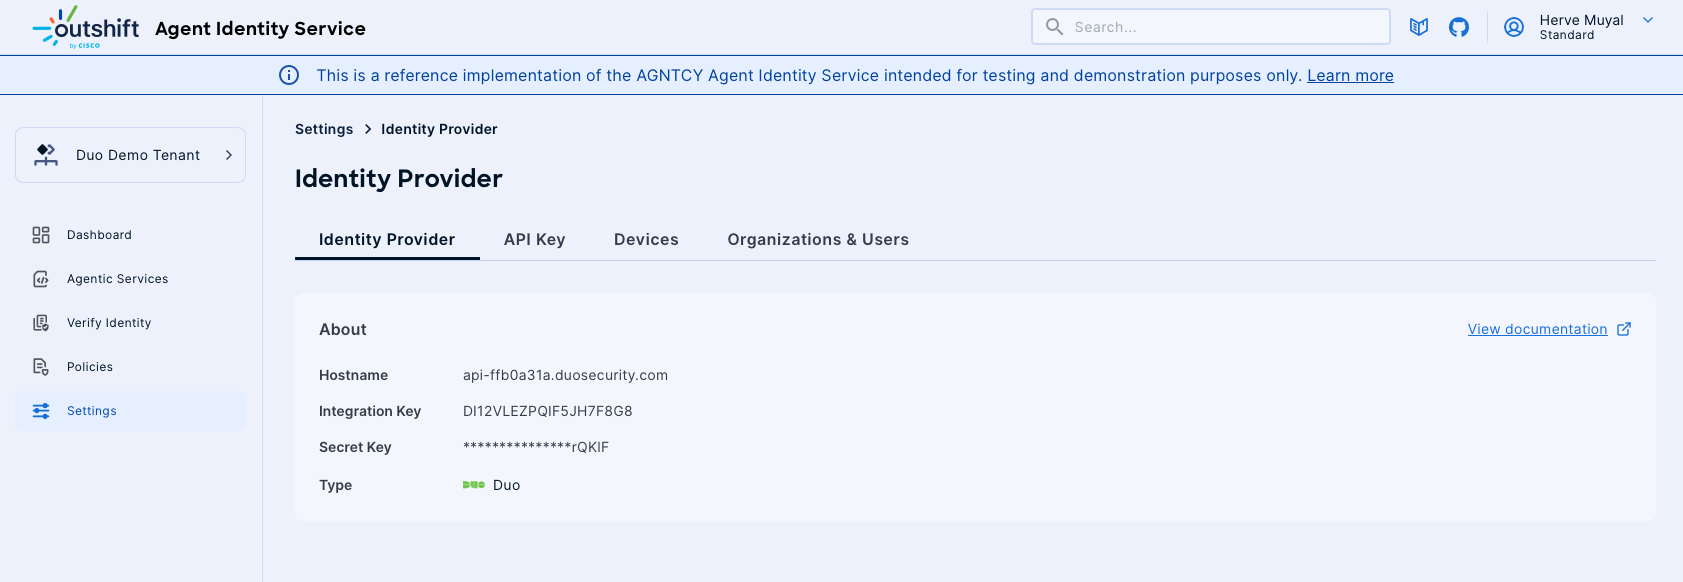
- Once all required details (Hostname, Integration Key, and Secret Key) have been accurately entered, click the Save button.
- Upon successful saving, your chosen Identity Provider will be registered and configured within AGNTCY Identity Service.
- If you need to discard the entered information and cancel the creation process, click the Cancel button.
Connecting Microsoft Entra ID as an Identity Provider
This guide specifically details the process for configuring Microsoft Entra ID (formerly Azure Active Directory) as an Identity Provider.
Prerequisites
Before you begin the Identity Provider connection process, ensure you have the following:
-
Access to AGNTCY Identity Service: You must have an administrator role or sufficient permissions within the AGNTCY Identity Service application to access the Settings and connect Identity Providers.
-
Microsoft Azure Account: An active Microsoft Azure account with access to Microsoft Entra ID (formerly Azure Active Directory).
-
Entra ID Application Details: You must have an application registered in Microsoft Entra ID with the Microsoft Graph API
Application.ReadWrite.Allpermission (granted as Application permission with admin consent). From this app registration, you will need to retrieve:- Your Tenant ID (Directory ID)
- The Client ID (Application ID)
- A Client Secret (application secret value)
If you need to set up your application, follow the Entra ID Application Configuration steps below. If your application is already configured, jump directly to Identity Provider Connection Steps.
Entra ID Application Configuration
If you already have your Entra ID Application Details, you can skip this section and jump directly to Identity Provider Connection Steps.
If you need to set up your Entra ID application from scratch, follow these steps:
-
Create App Registration: Follow the Microsoft Entra ID App Registration documentation to register a new "Web" application (though any type supporting client credentials will work).
-
Configure Microsoft Graph API Permissions:
- Navigate to API permissions in your app registration
- Click Add a permission → Microsoft Graph → Application permissions
- Search for and add
Application.ReadWrite.All - Click Grant admin consent for [Your Organization] (requires administrator role)
- Verify the permission shows "Granted" status
- This allows AGNTCY Identity Service to create and manage application registrations for your agentic services
-
Create Client Secret: Follow the Microsoft documentation on adding credentials to create a client secret. Save the value securely (it will only be shown once).
-
Gather Required Information:
- Tenant ID (Directory ID) - found in your app registration overview
- Client ID (Application ID) - found in your app registration overview
- Client Secret - the value you created in step 3
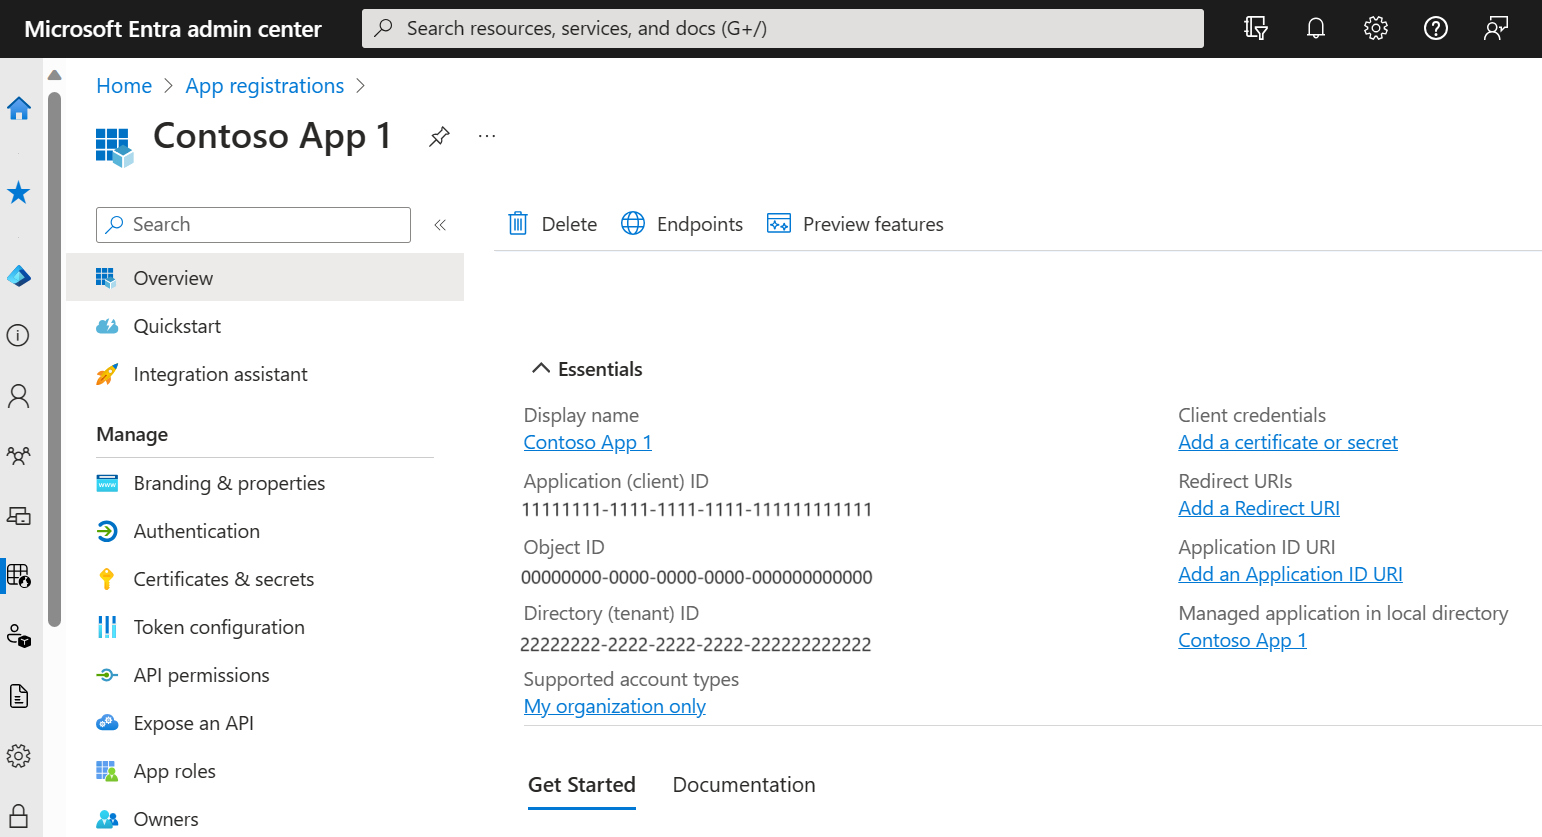
Microsoft Entra ID uses a globally distributed architecture. After creating applications or service principals, there may be a brief replication delay (typically seconds to a couple of minutes) before the resources are available across all data centers. The AGNTCY Identity Service automatically handles this with built-in retry mechanisms.
For more information, see the Microsoft documentation on 404 errors.
Identity Provider Connection Steps
Follow these steps to configure and register your Identity Provider:
-
Select Identity Provider:
- On the "Identity Provider Connection" page, you will be presented with a selection of supported Identity Providers.
- Carefully choose the provider you intend to integrate:
- Microsoft Entra ID (for Microsoft Azure Active Directory integration)
- Critical Note: The selection of an Identity Provider is a one-time action. Once saved, this choice cannot be modified later. Ensure you select the correct provider before proceeding.
-
Enter Provider Details:
After selecting Microsoft Entra ID, the "Provider details" section will become active. Enter the values you gathered from the Prerequisites section:
- Tenant ID: Your Azure AD Tenant ID (Directory ID)
- Example:
12345678-1234-1234-1234-123456789abc
- Example:
- Client ID: Your Application ID from the app registration
- Example:
abcdef12-3456-7890-abcd-ef1234567890
- Example:
- Client Secret: The client secret value you created (will be masked for security)
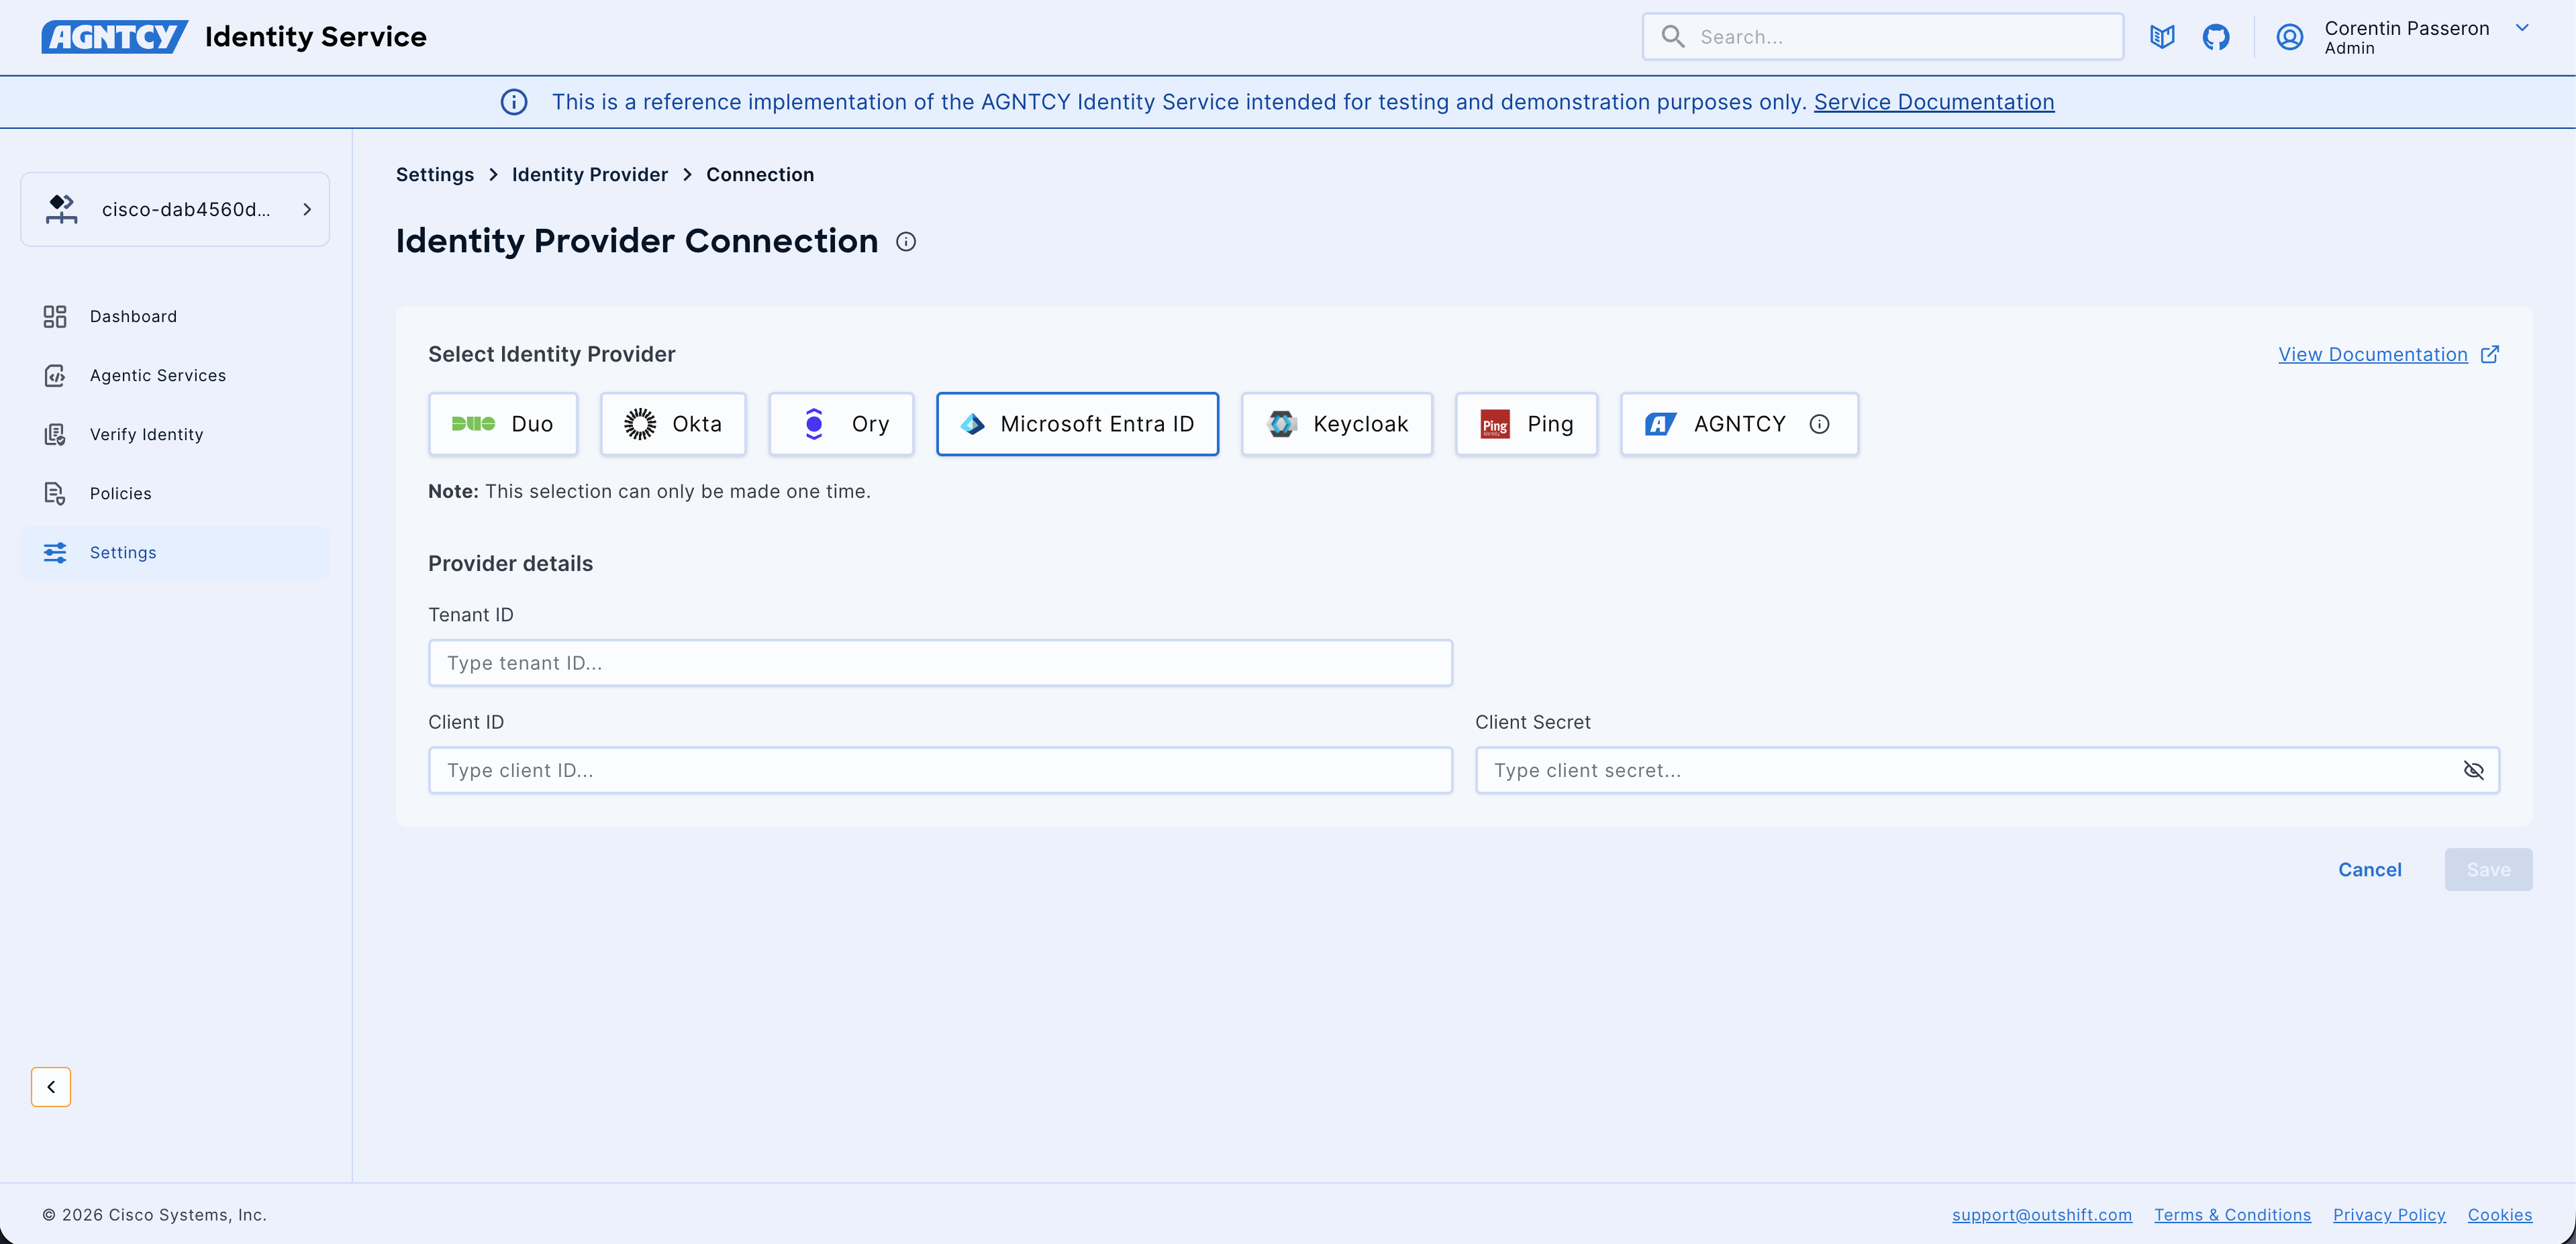
- Tenant ID: Your Azure AD Tenant ID (Directory ID)
-
Save Configuration:
- Click the Save button to register your Microsoft Entra ID provider.
- Upon successful saving, AGNTCY Identity Service will verify the connection and register the provider.
- Click Cancel to discard changes if needed.
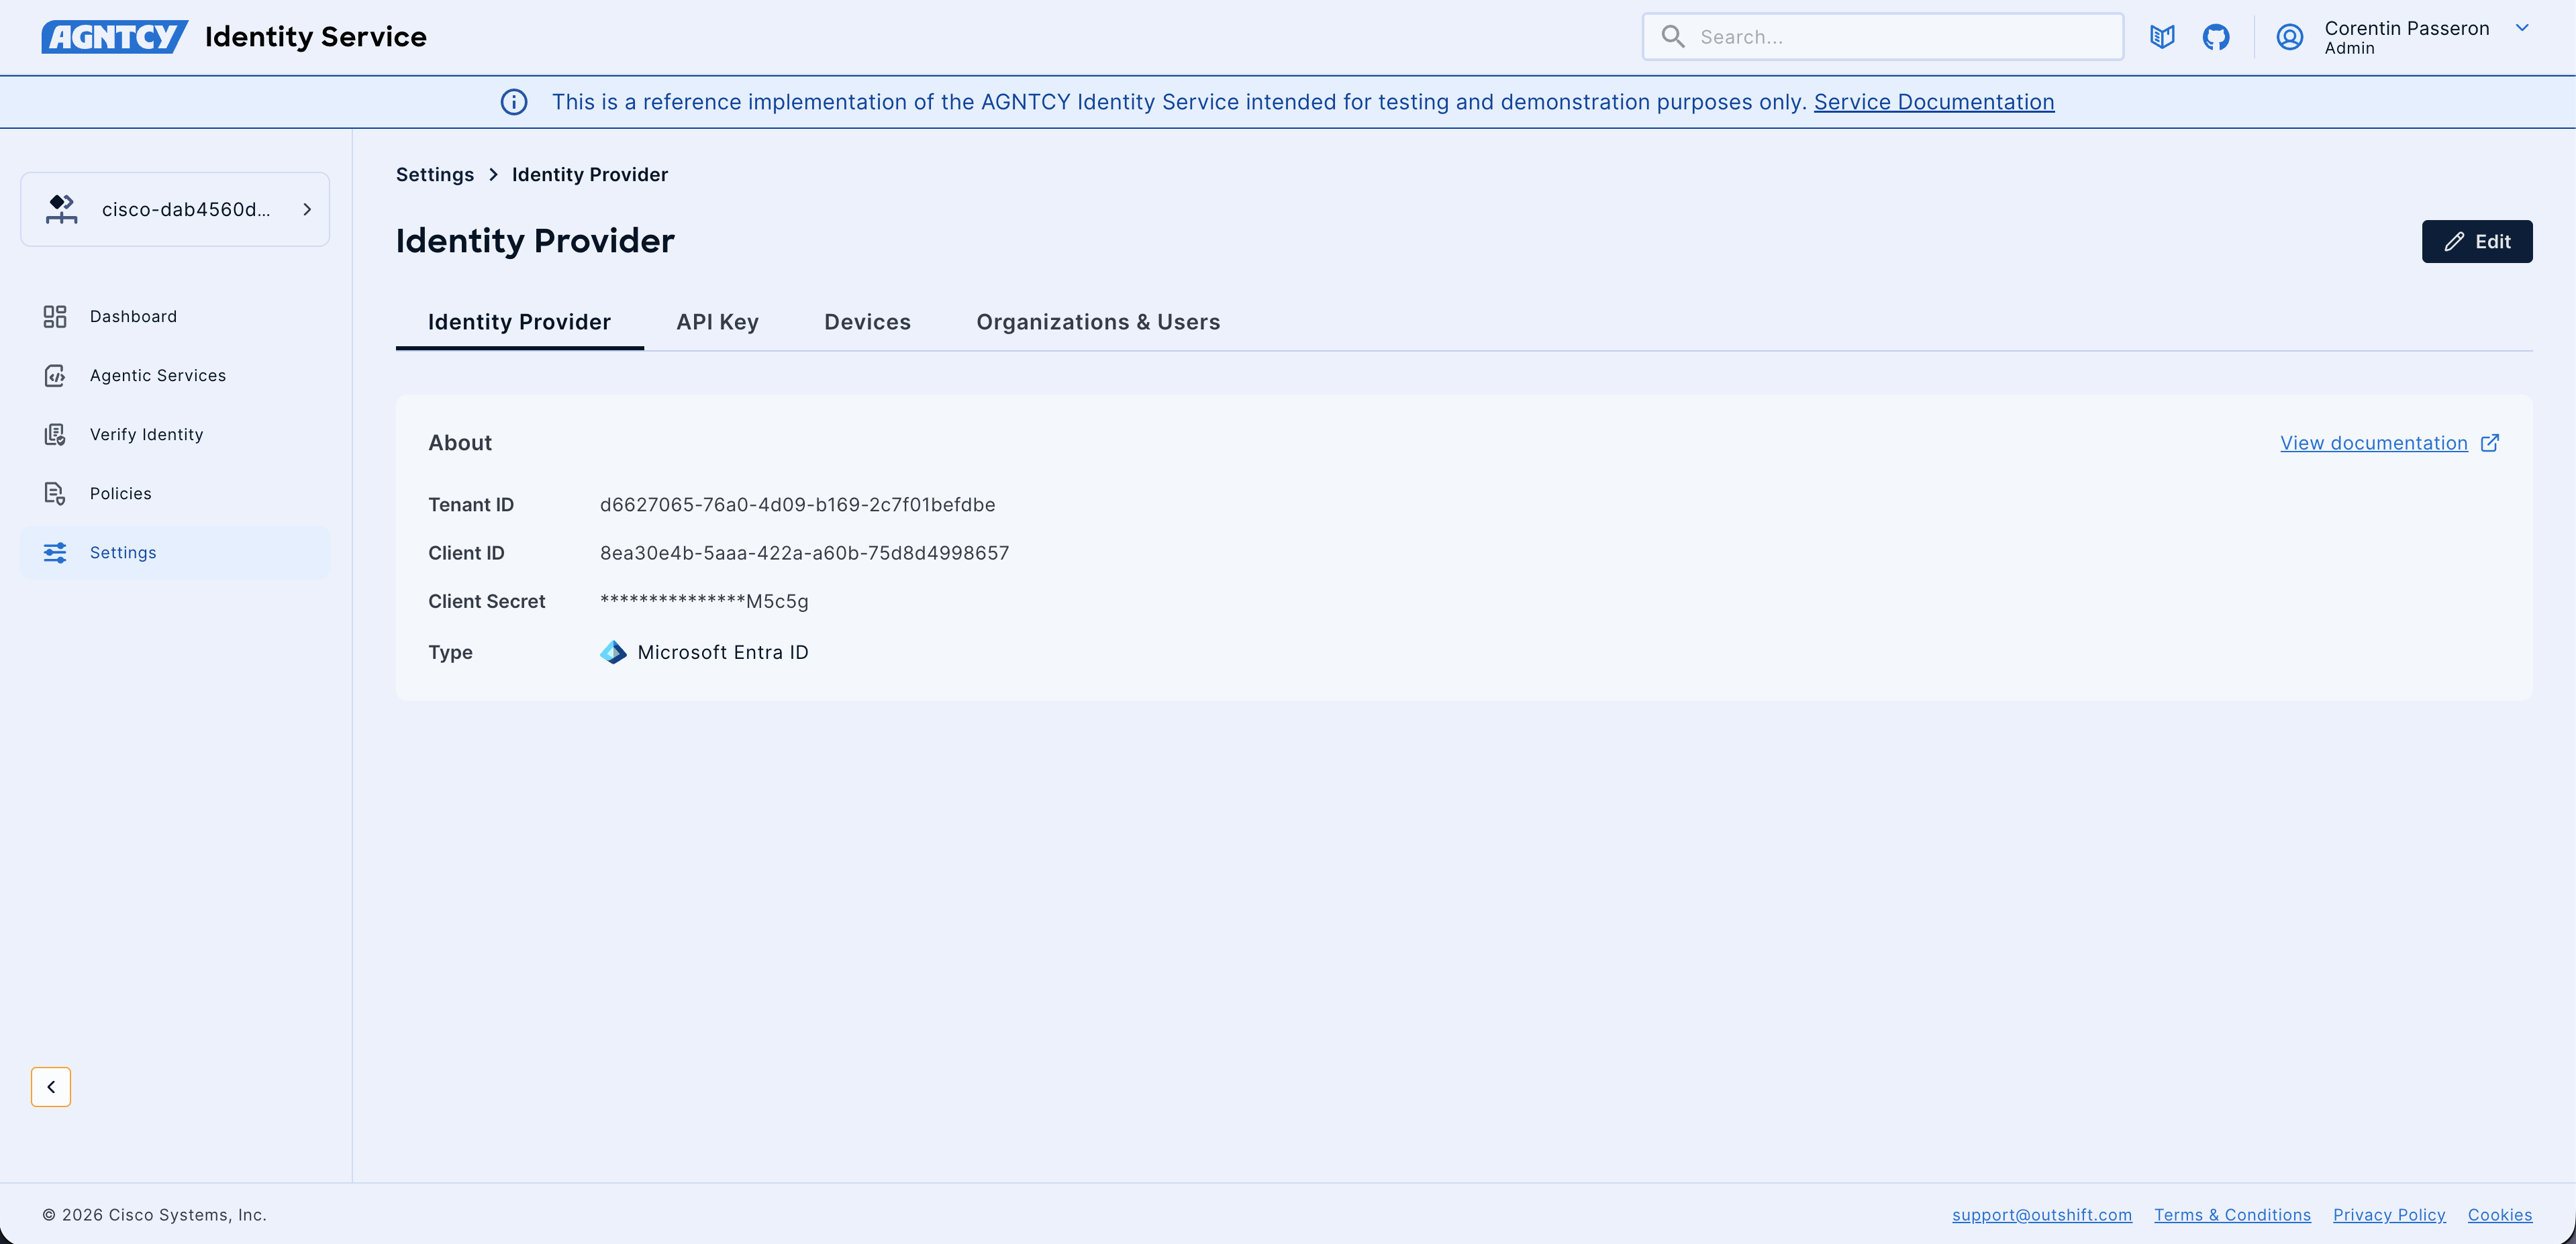
The AGNTCY Identity Service will use this app registration to dynamically create and manage OAuth client credentials for your agentic services. Each agentic service will receive its own dedicated app registration with isolated credentials, following the principle of least privilege.
Connecting Okta as an Identity Provider
This guide specifically details the process for configuring Okta as an Identity Provider.
Prerequisites
Before you begin the Identity Provider connection process, ensure you have the following:
- Access to AGNTCY Identity Service: You must have an administrator role or sufficient permissions within the AGNTCY Identity Service application to access the Settings and connect Identity Providers.
- Okta Platform Account: An active Okta Platform account is required.
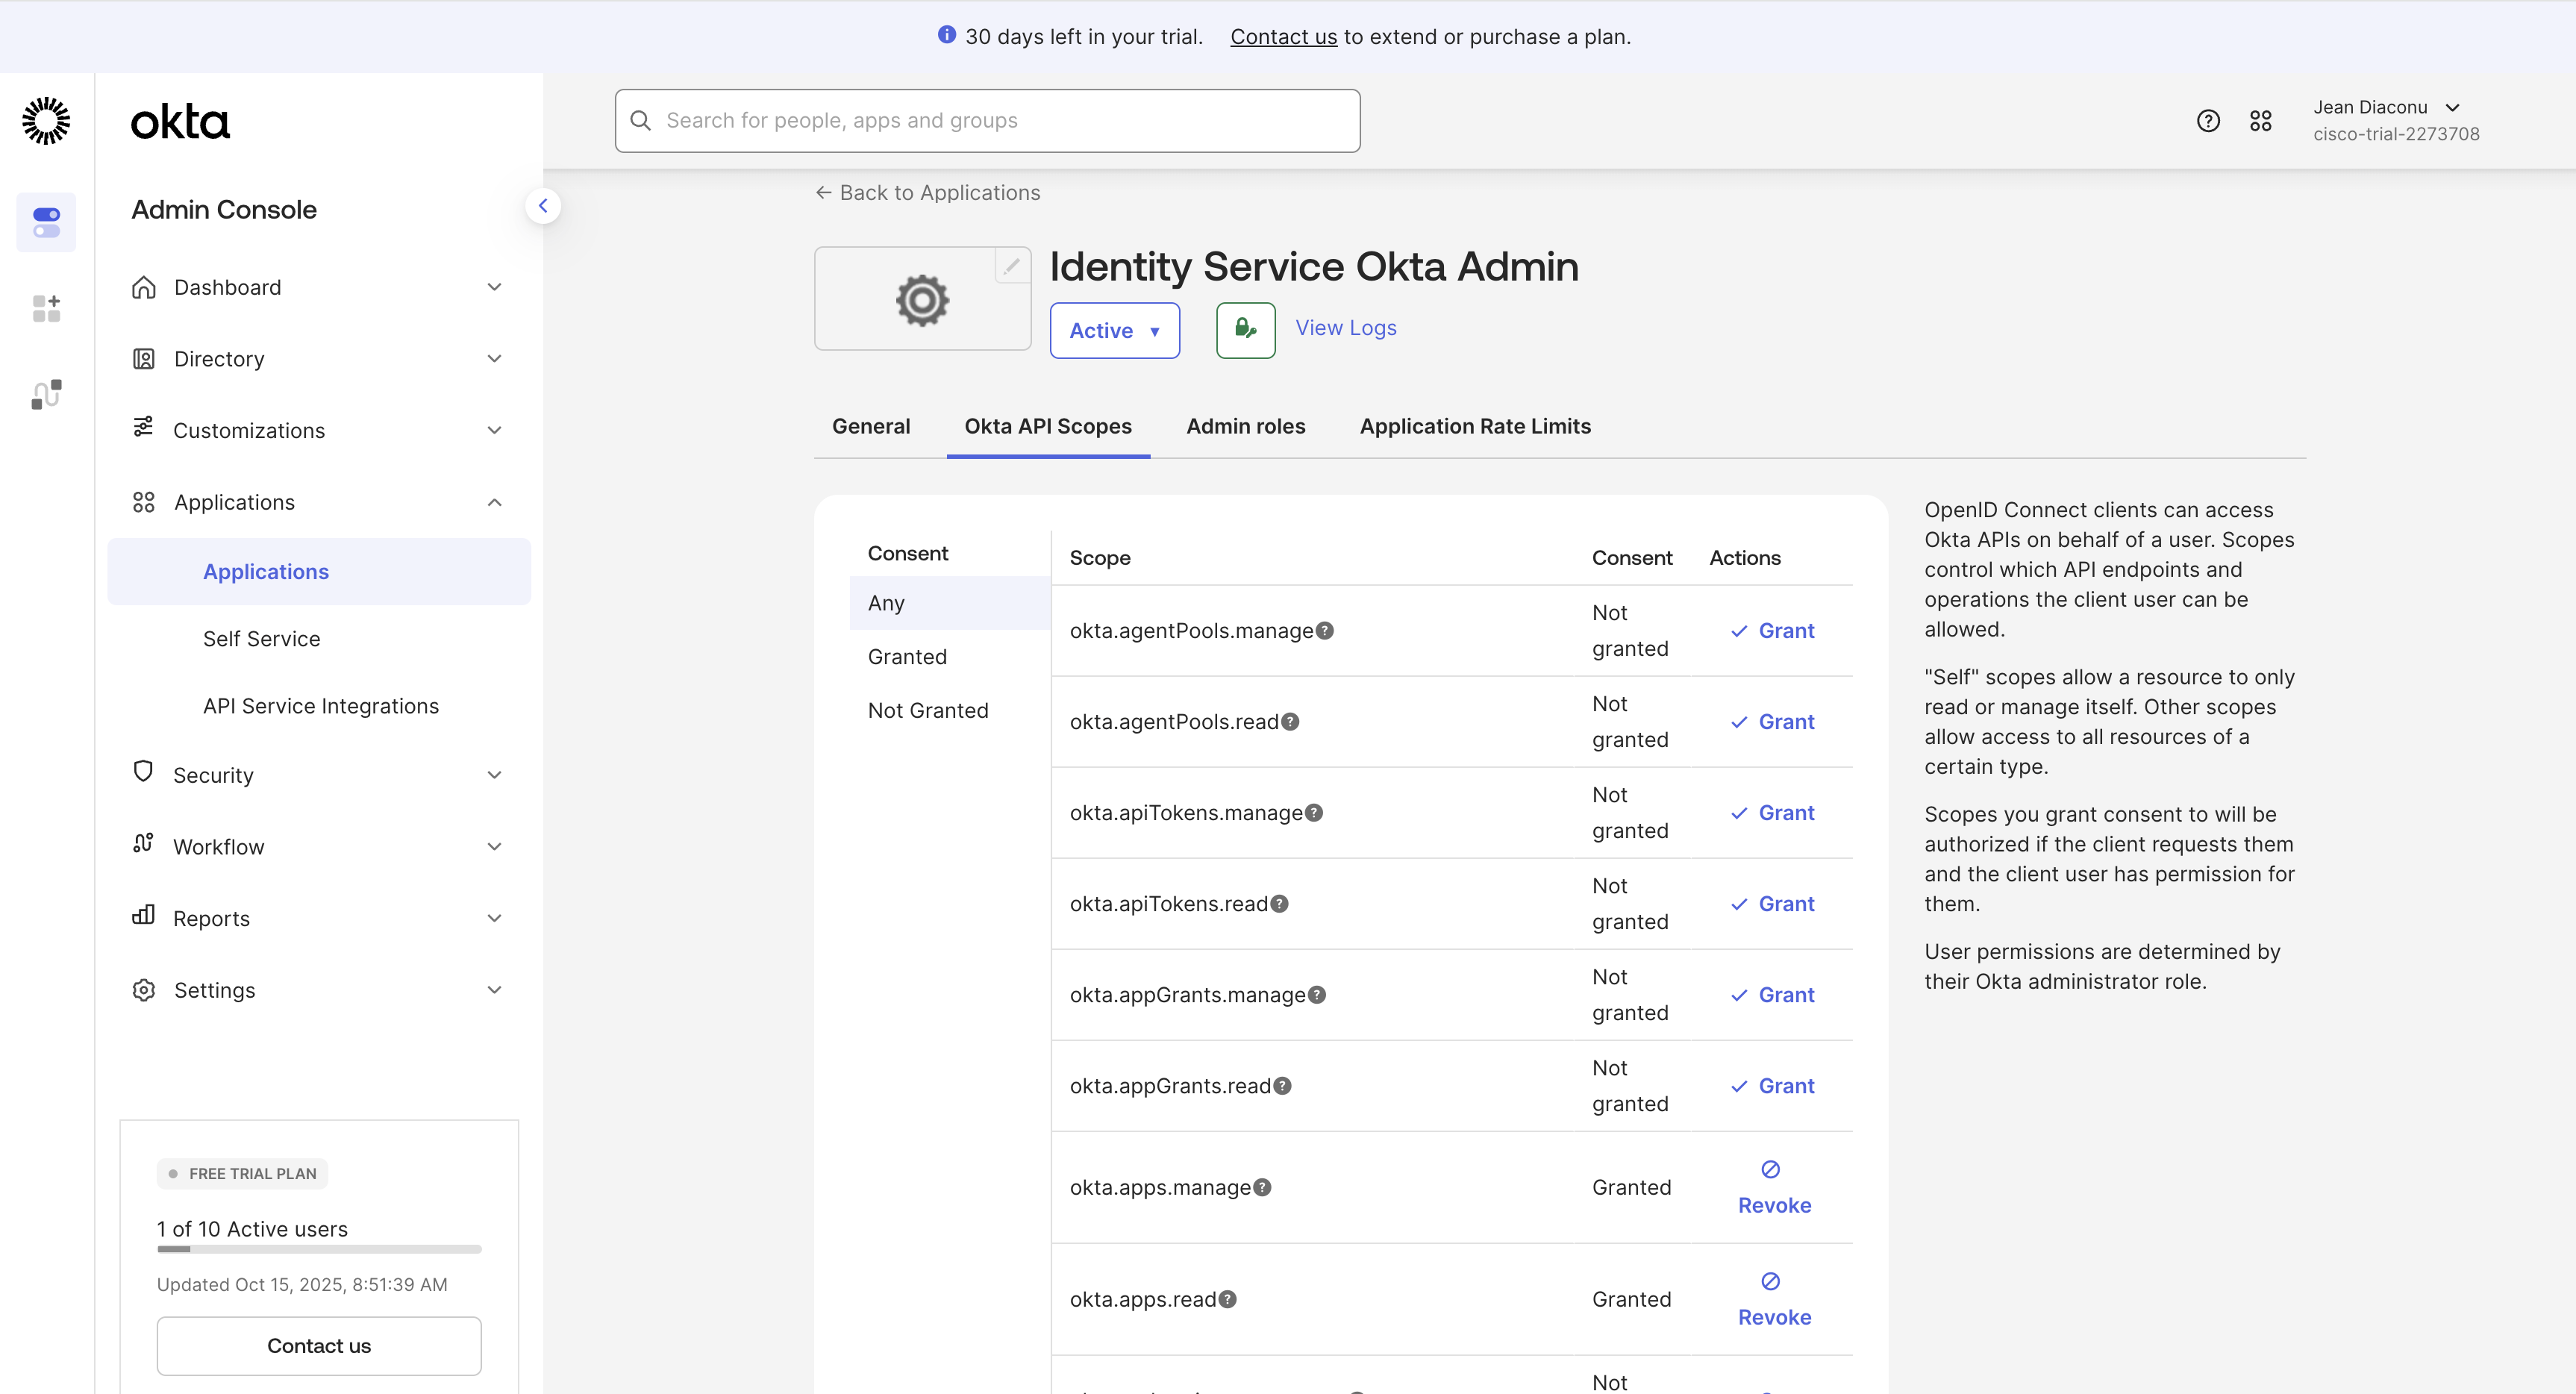
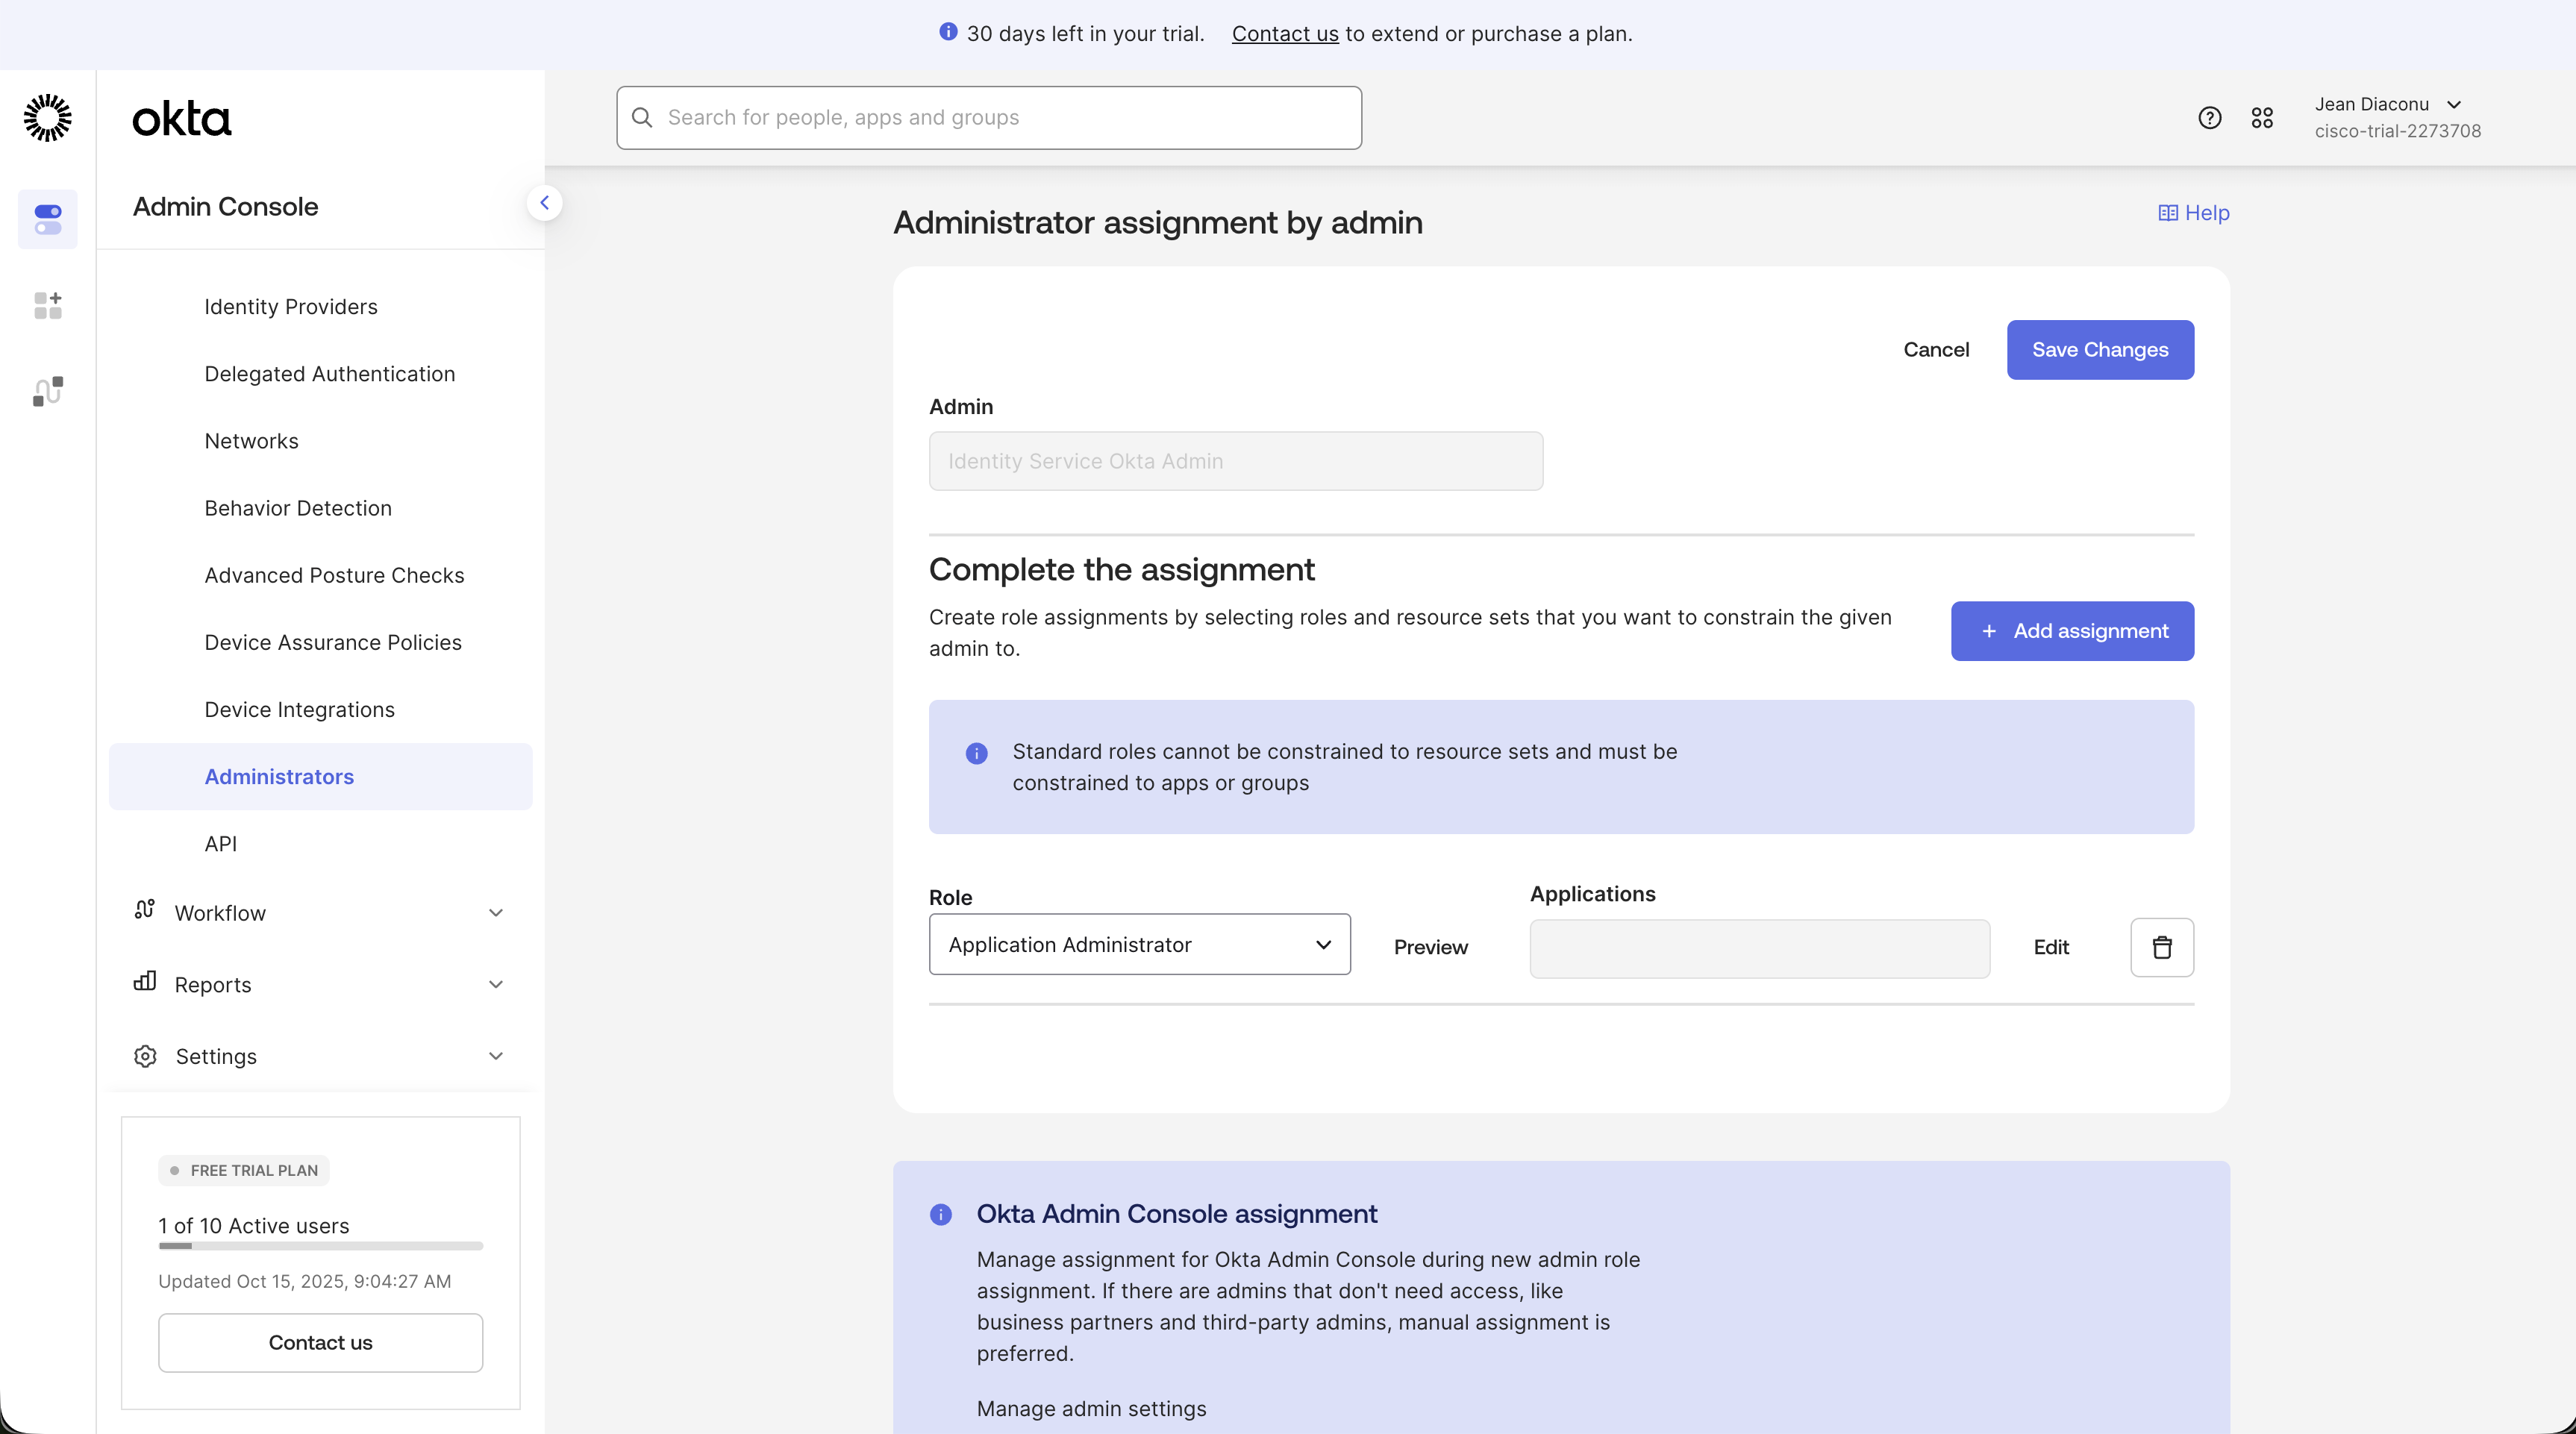
- Okta Admin Management API access: You must setup an Okta application configured within your Okta Admin Panel. From this application, you will need to retrieve:
- Your Okta Organization URL
- The Client ID for your Okta application
- The Private Key in PEM format (base64 value) for your Okta application
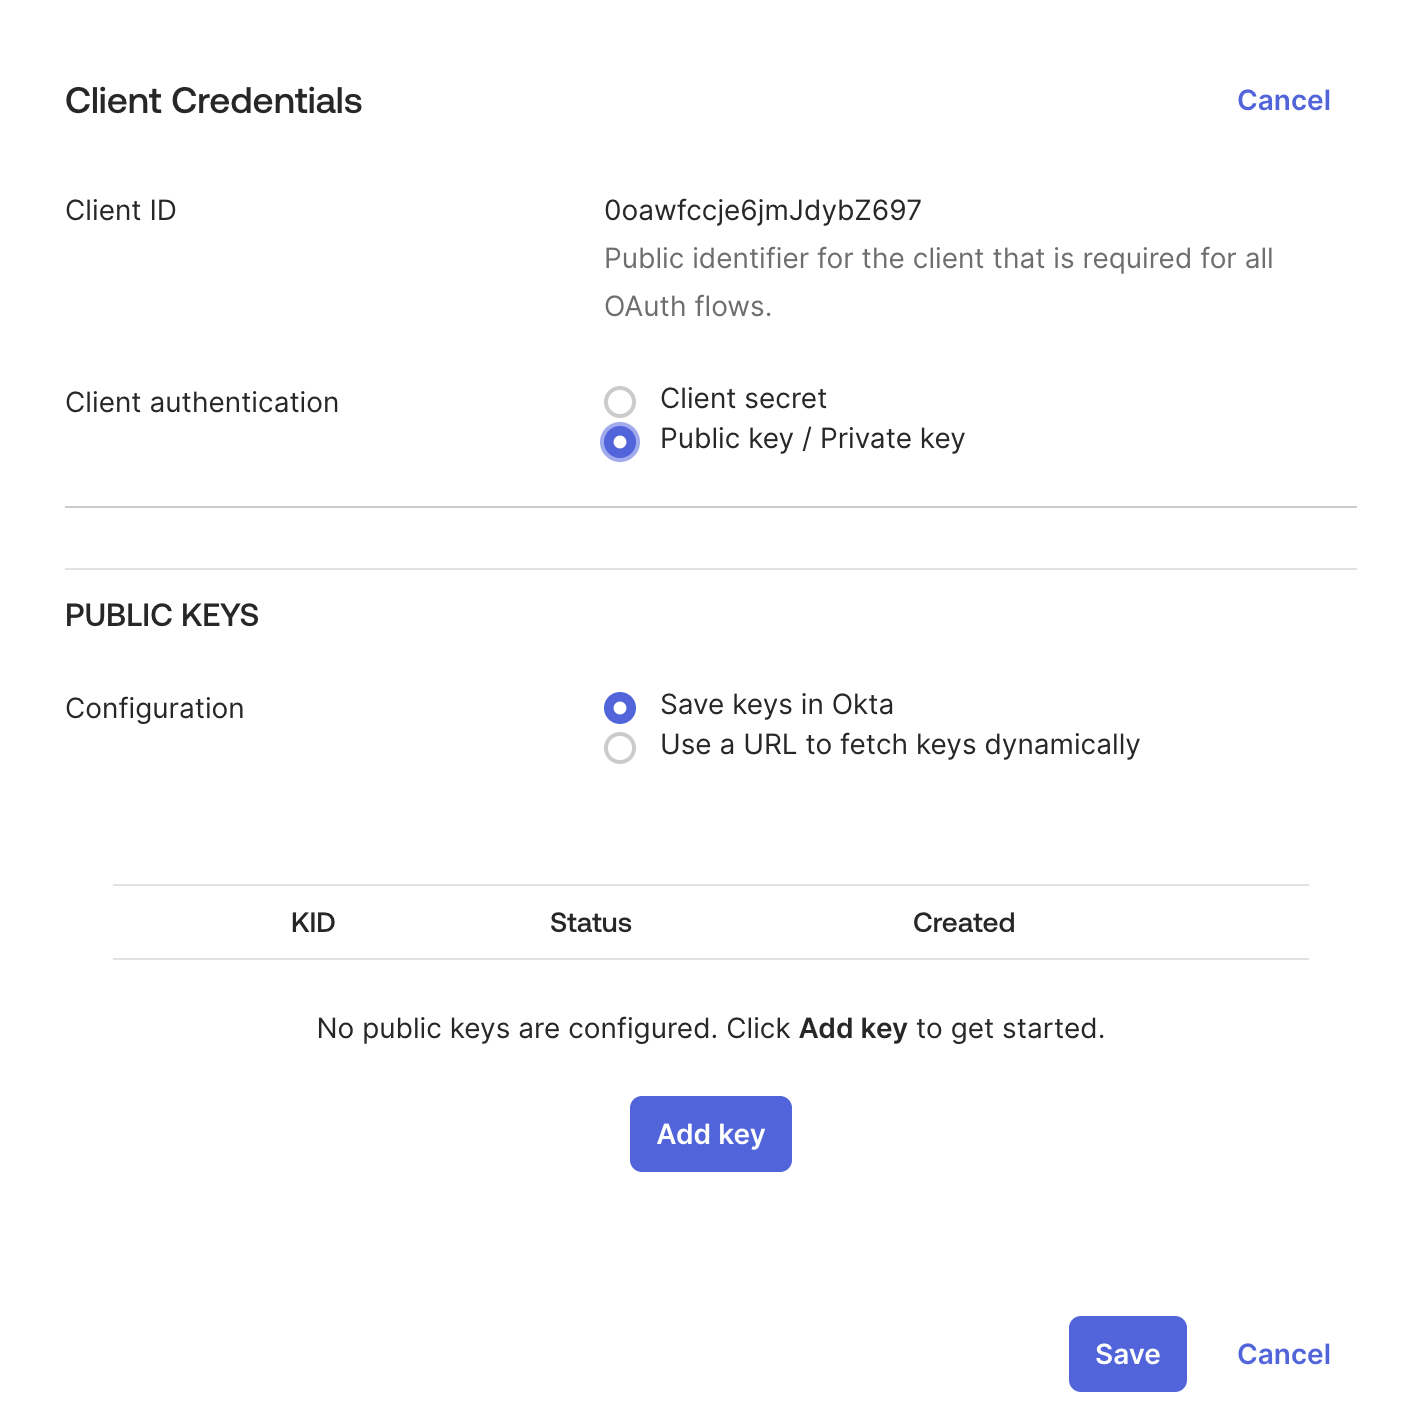
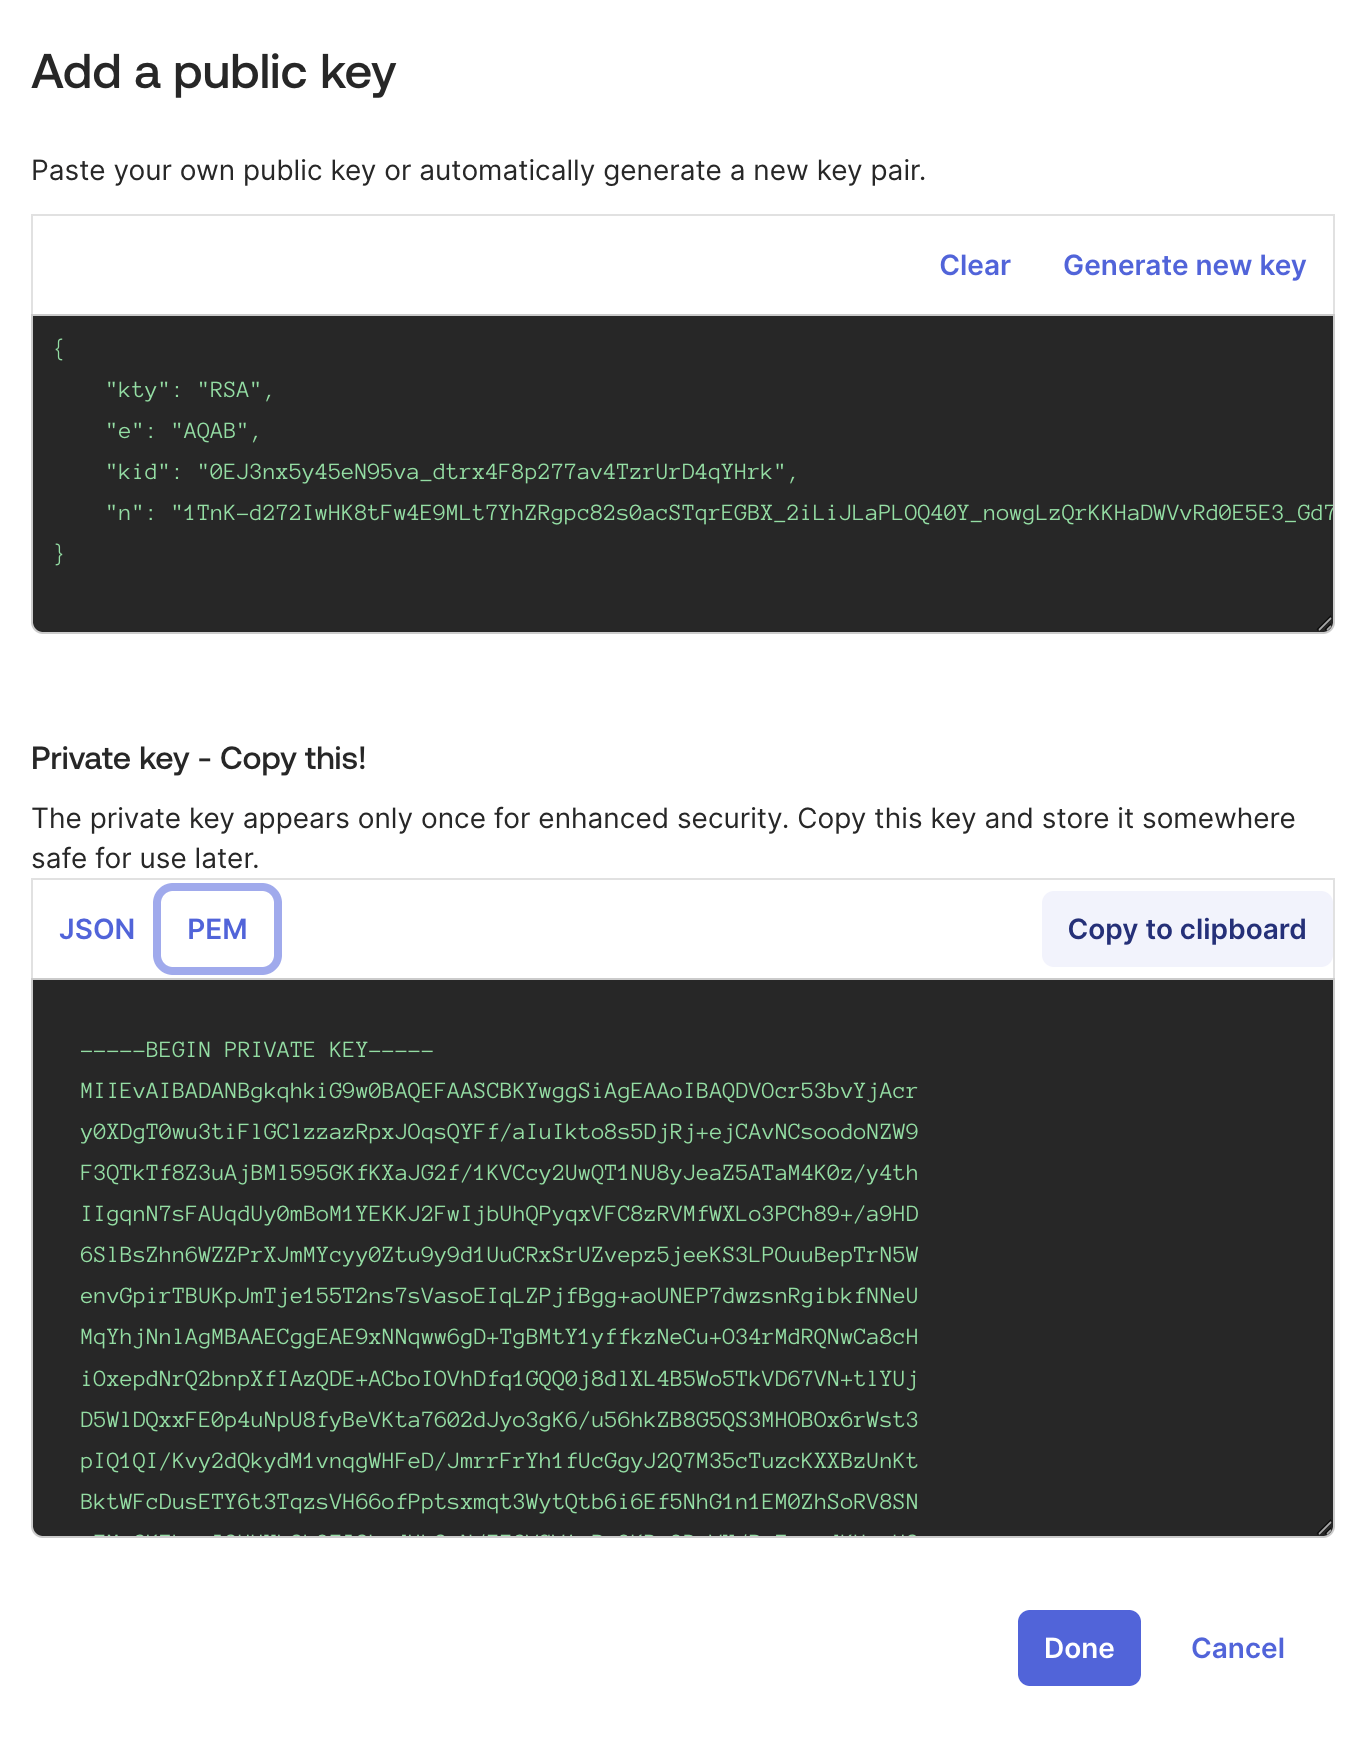
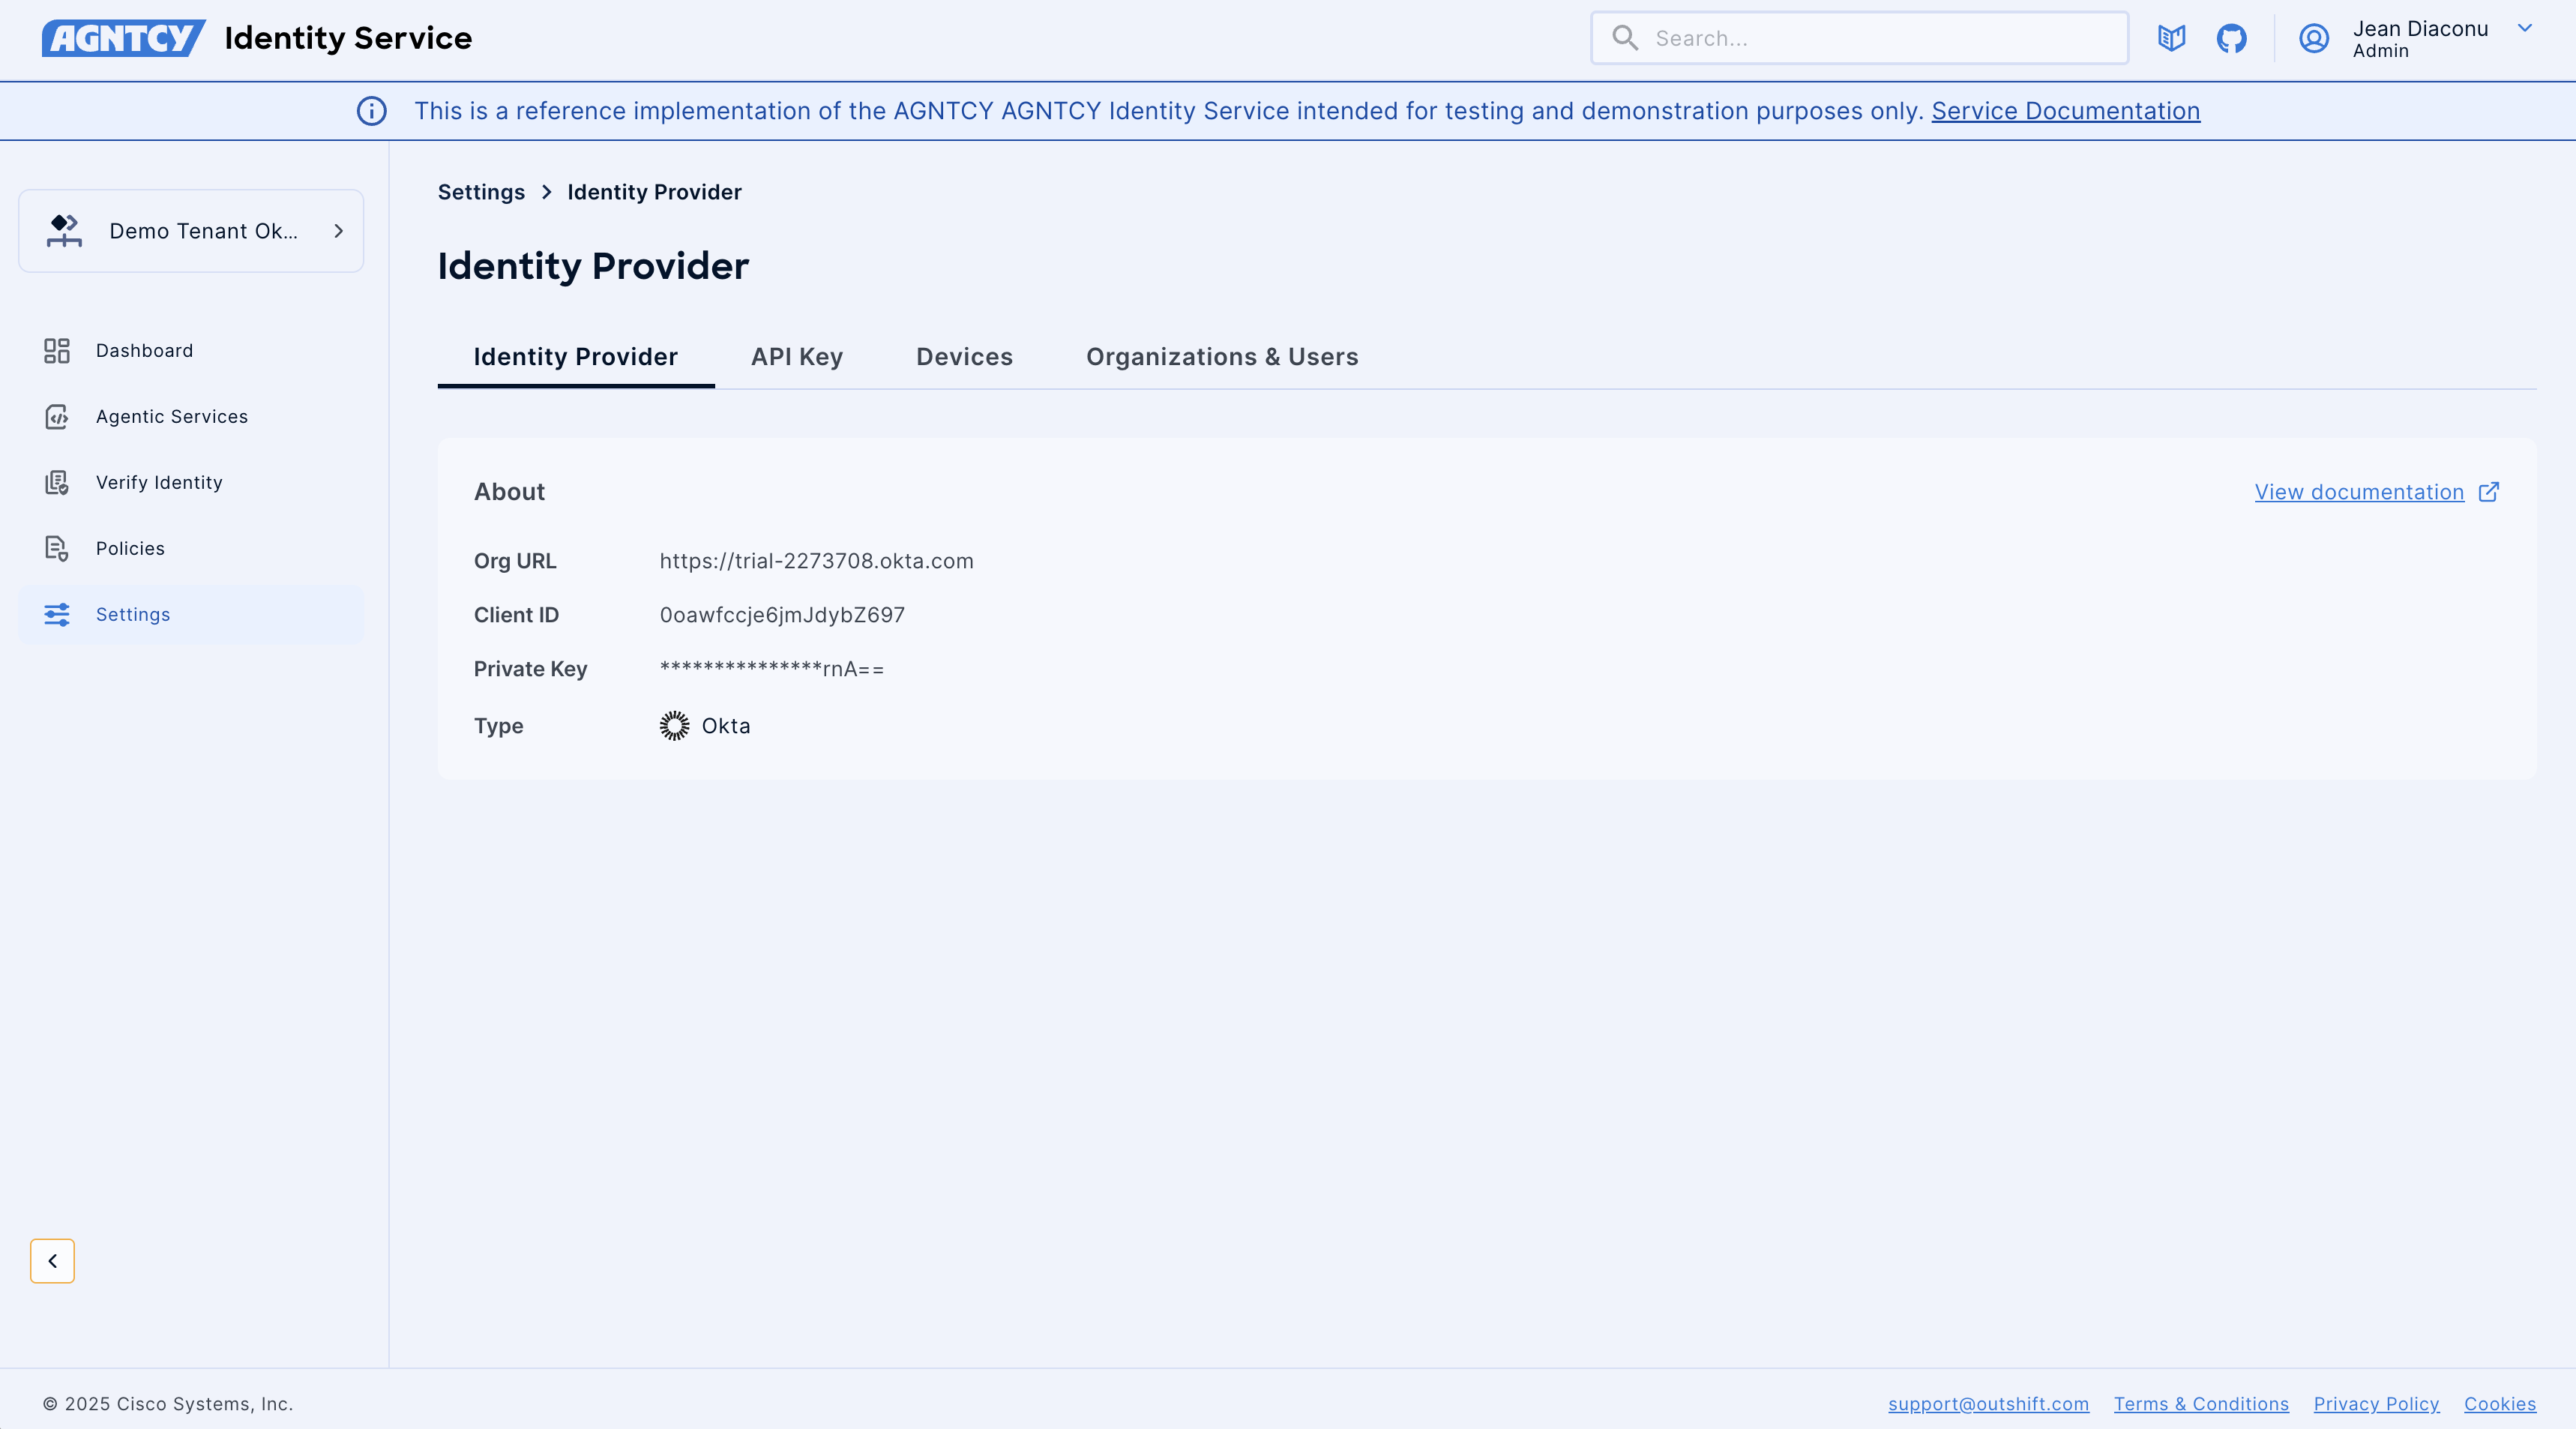
You can follow the OAuth guide for Okta for detailed instructions on how to create and setup the application within Okta Platform.
Below you can find a screenshot of the Okta Admin Panel interface, with all the necessary permissions and the necessary fields for your integration.
Identity Provider Connection Steps
Follow these steps to configure and register your Identity Provider:
-
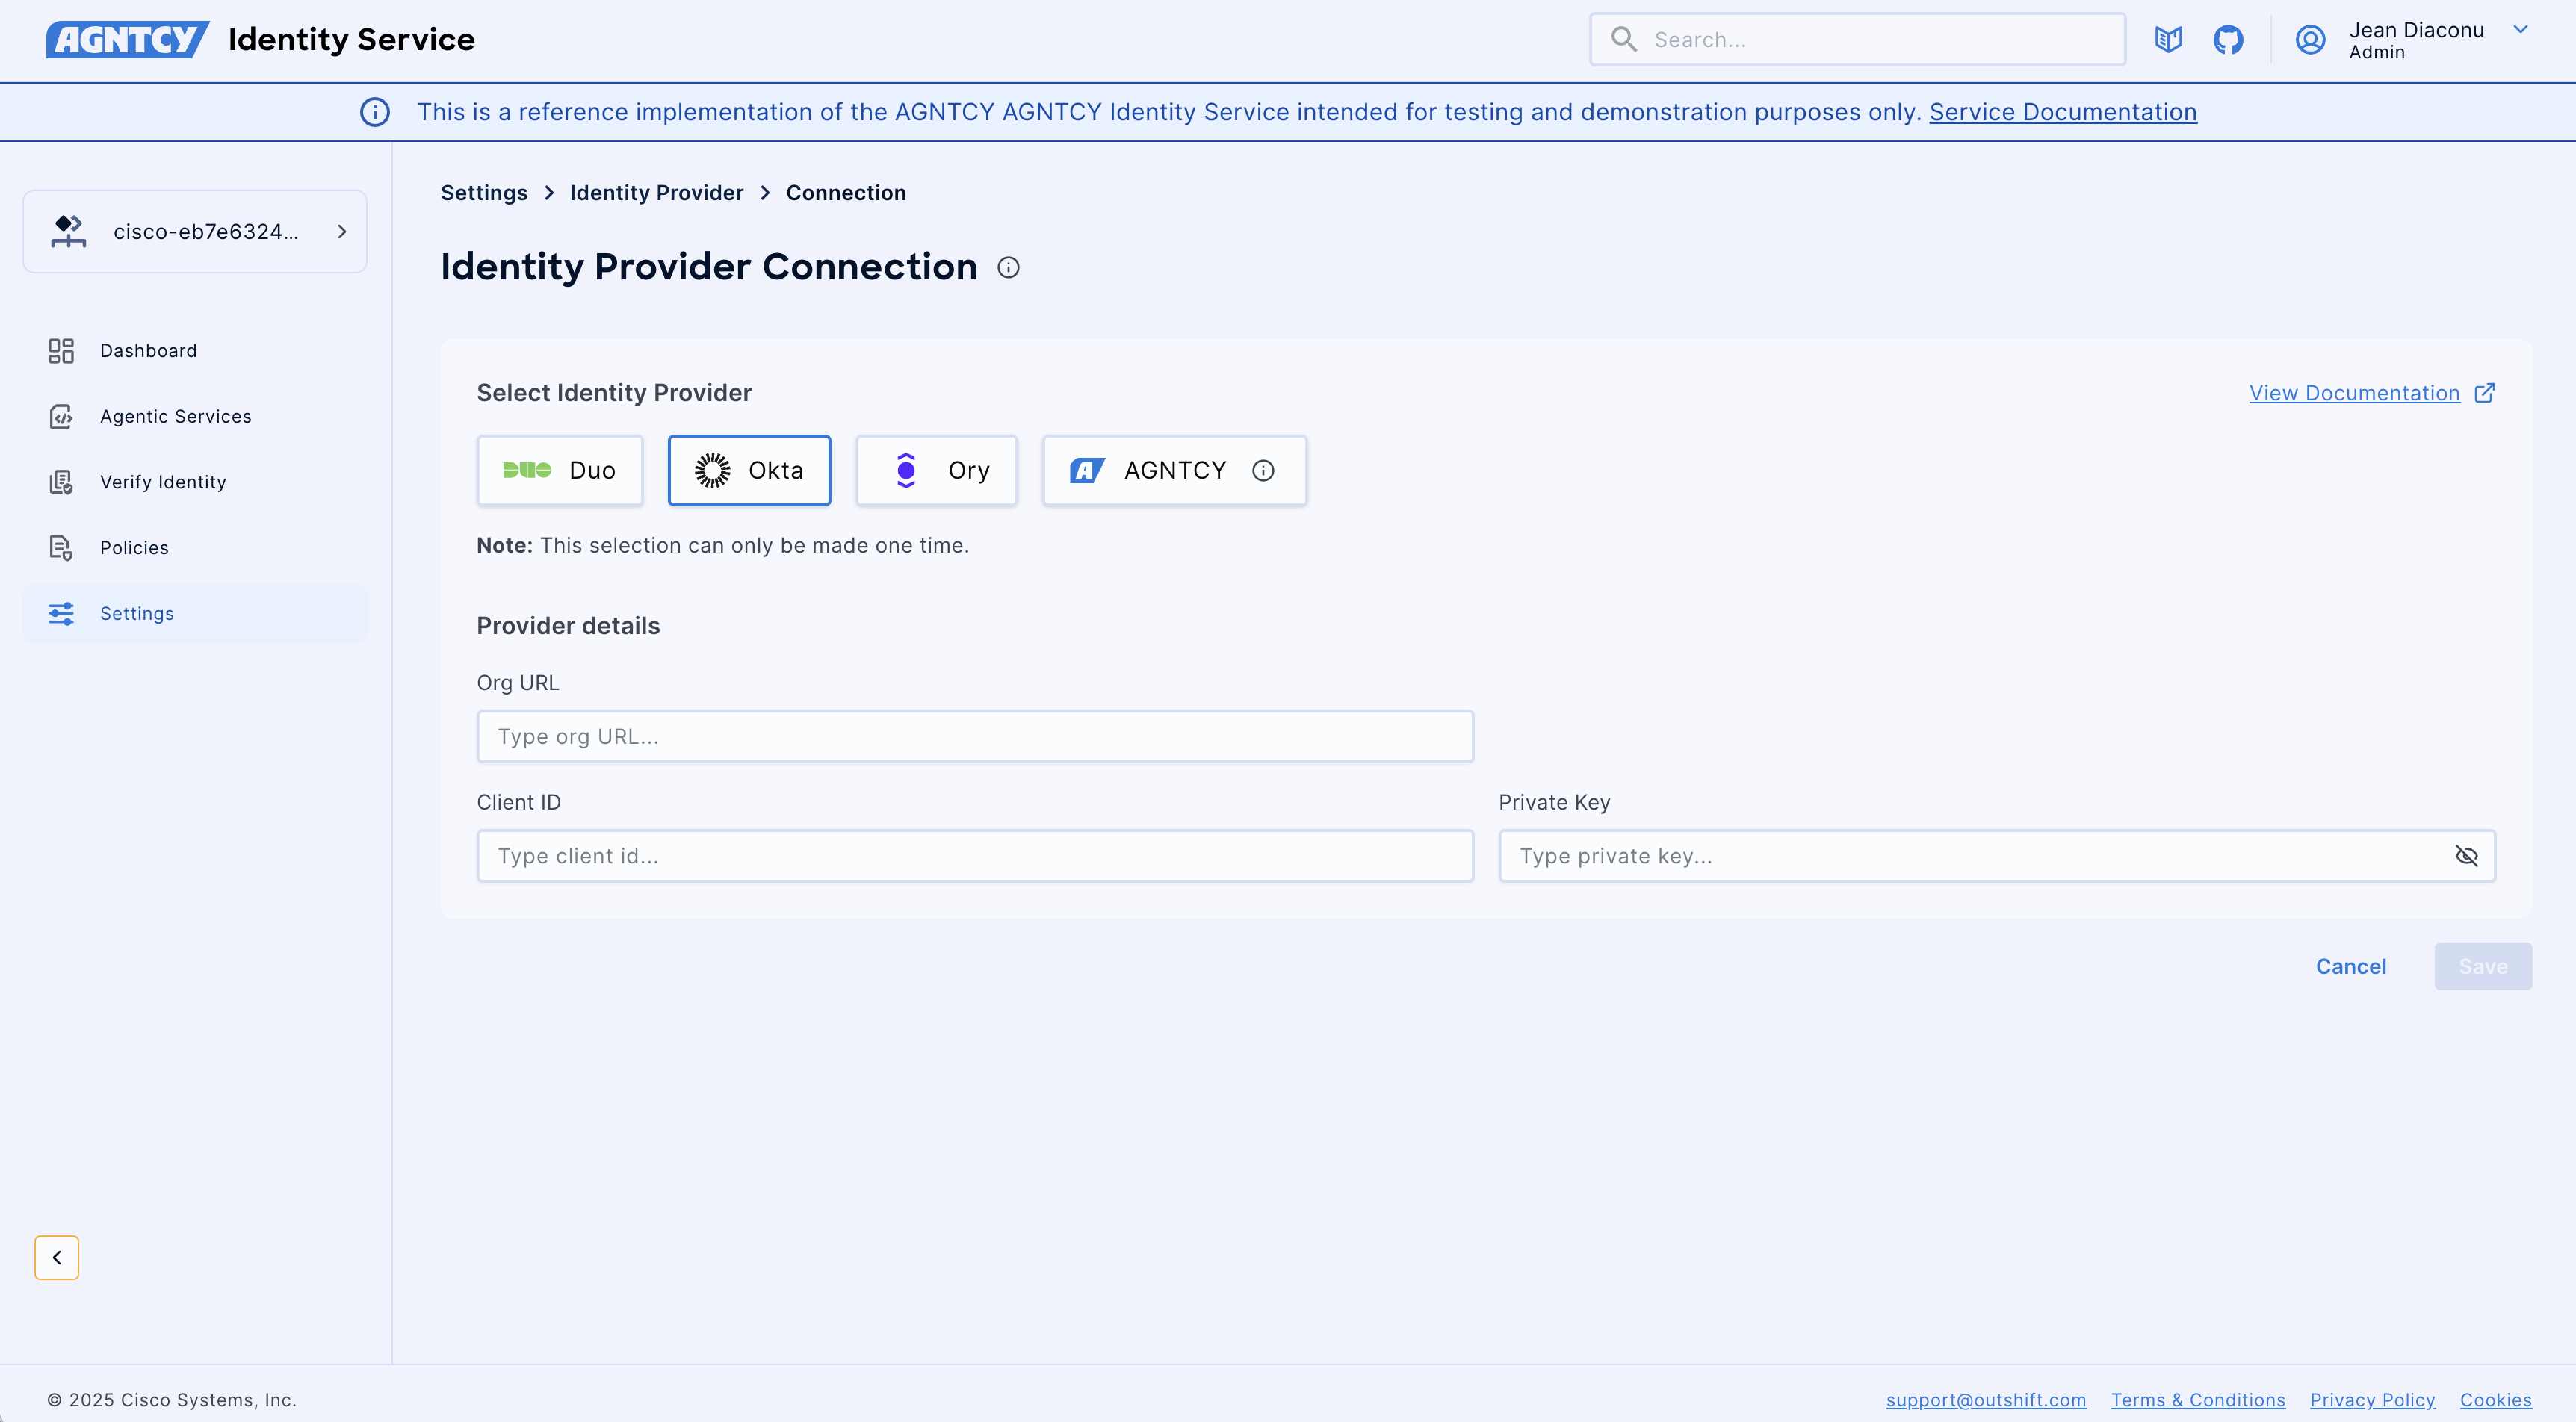
Select Identity Provider:
- On the "Identity Provider Connection" page, you will be presented with a selection of supported Identity Providers.
- Carefully choose the provider you intend to integrate:
- Okta (as shown in the example, for Okta integration)
- Critical Note: The selection of an Identity Provider is a one-time action. Once saved, this choice cannot be modified later. Ensure you select the correct provider before proceeding.
-
Enter Provider Details:
- After selecting your desired Identity Provider (e.g., Okta), the "Provider details" section will become active, prompting you for specific configuration parameters.
- Organization URL: Enter the Organization URL for your Okta account. This is your unique Okta API endpoint.
- Example:
https://trial-2273708.okta.com/
- Example:
- Client ID: Input the Client ID. This key uniquely identifies your application within Okta and is obtained from your Okta Admin Panel when you create or configure an application.
- Example:
0oawfccje6jmJdybZ697
- Example:
- Private Key: Provide the Private Key in PEM format (base64 value). This is a sensitive credential used for cryptographic signing of requests to the Okta API, ensuring the authenticity and integrity of communications. It is also obtained from your Okta Admin Panel.
For security purposes, the input in this field will be masked (displayed as asterisks). - Example:
MIIEvQIBADANBgkqhkiG9w0BAQEFAASCBKcwggSjAgEAAoIBAQD...
-
Save Configuration:
- Once all required details (Organization URL, Client ID, Private Key) have been accurately entered, click the Save button.
- Upon successful saving, your chosen Identity Provider will be registered and configured within AGNTCY Identity Service.
- If you need to discard the entered information and cancel the creation process, click the Cancel button.
Connecting Ory as an Identity Provider
This guide specifically details the process for configuring Ory as an Identity Provider.
Prerequisites
Before you begin the Identity Provider connection process, ensure you have the following:
- Access to AGNTCY Identity Service: You must have an administrator role or sufficient permissions within the AGNTCY Identity Service application to access the Settings and connect Identity Providers.
- Ory Account: An active Ory account is required.
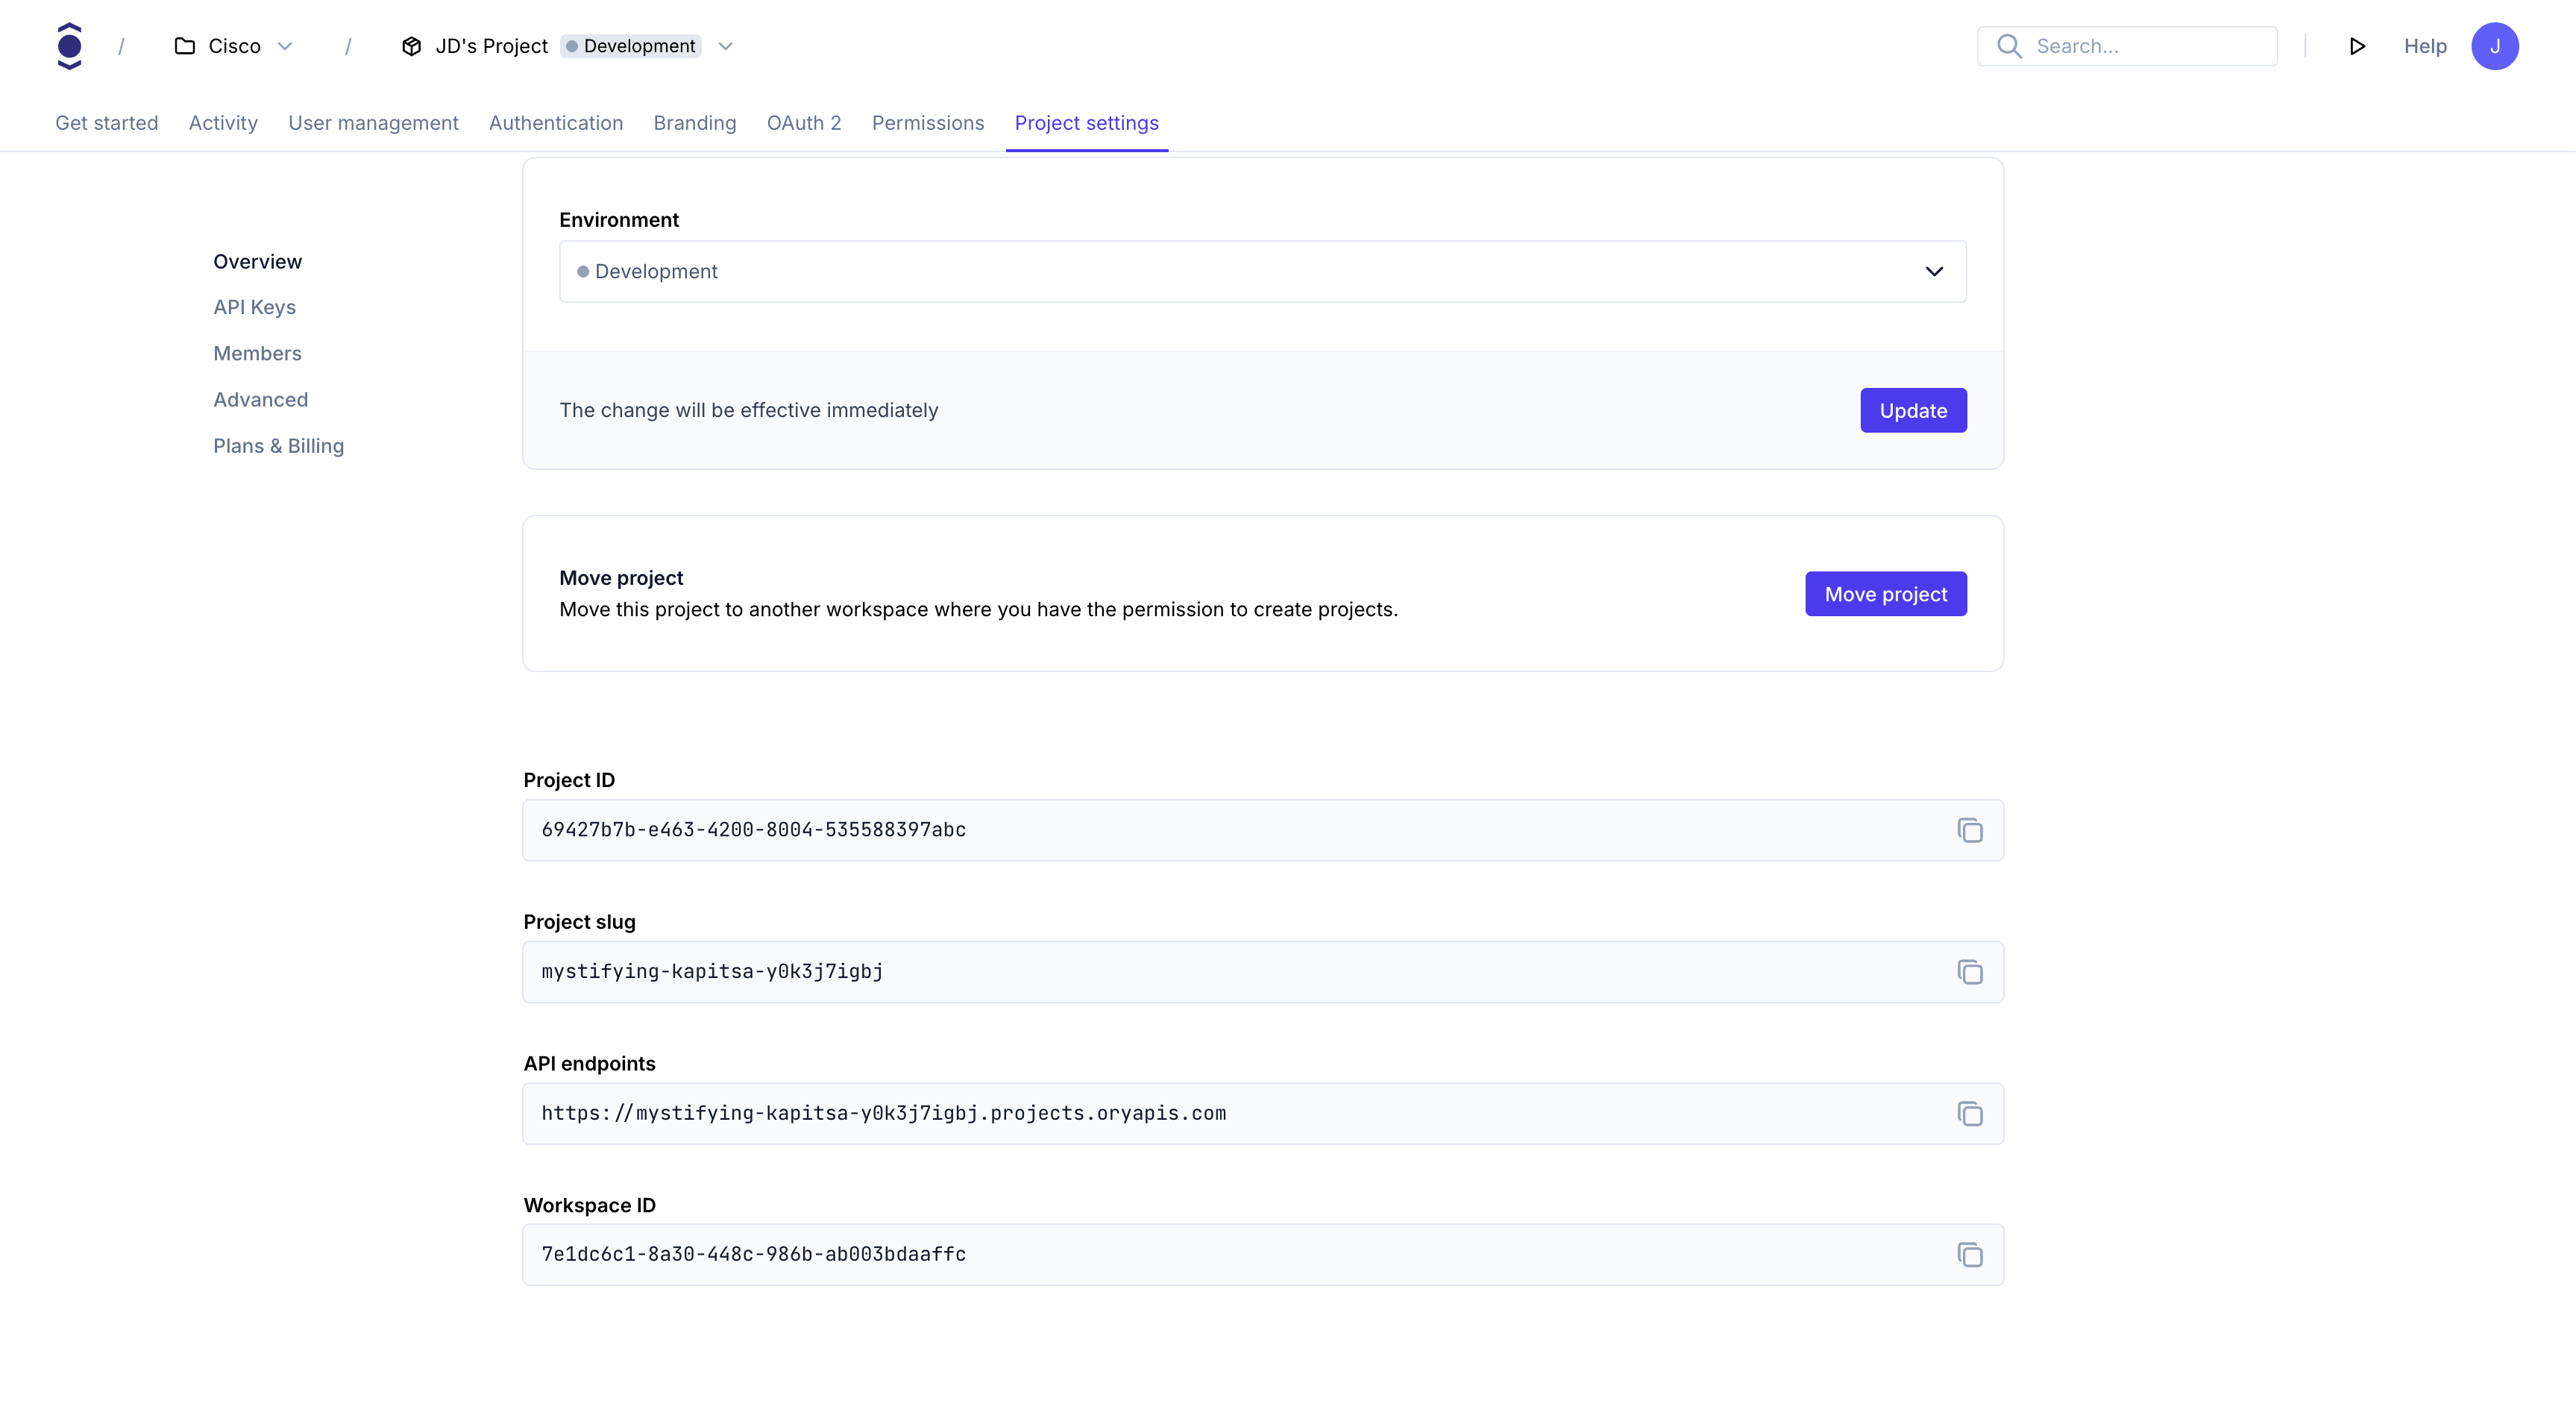
- Ory API Project Slug: Navigate to your Ory Console and select project settings to find your project slug.
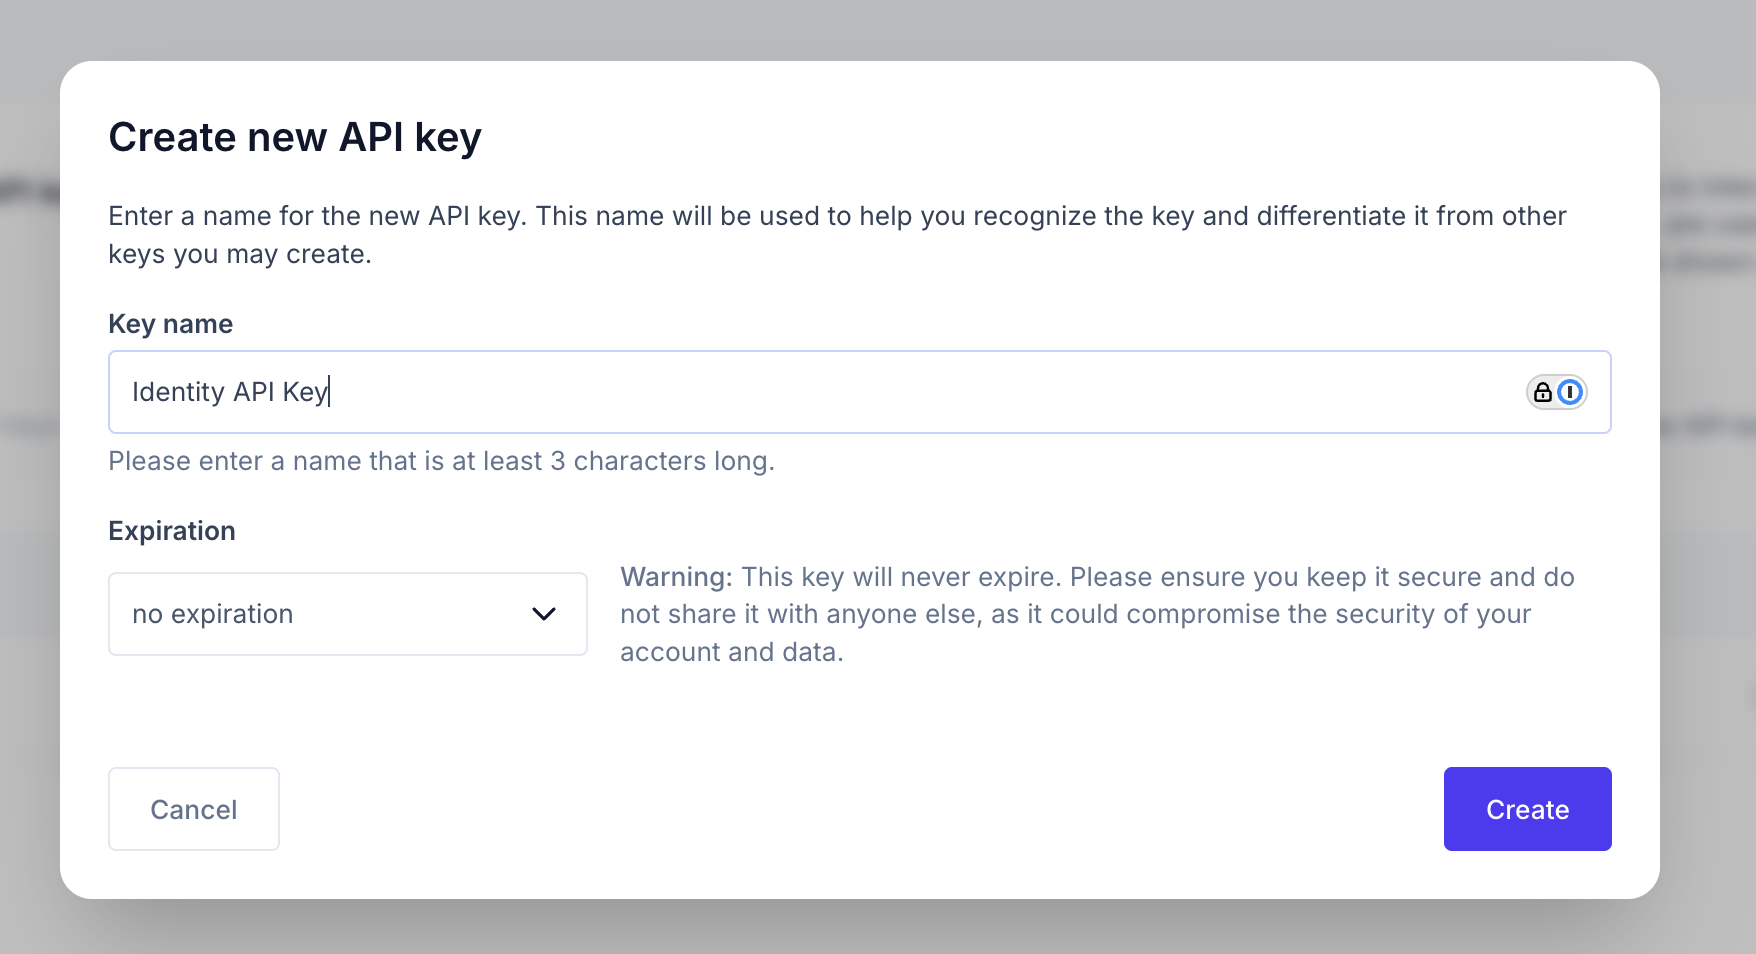
- Ory API Key: Create a new API key in your Ory Console. This key will be used to authenticate requests from AGNTCY Identity Service to Ory.
Ory accounts are free to create, and you can use them to manage your identity providers.
You can follow the Ory documentation for detailed instructions on how to create and manage projects and API keys within Ory.
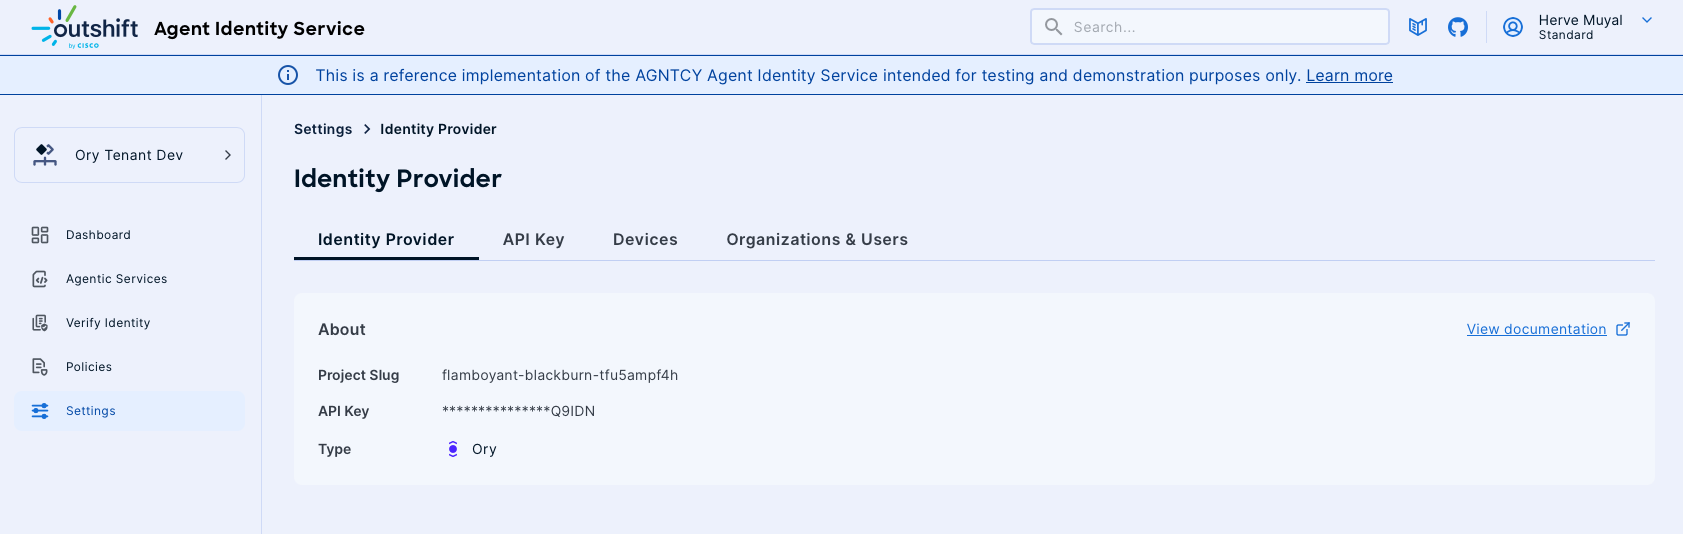
Below you can find screenshots of the Ory Console interface, showing where to find your project slug and how to create an API key.
Identity Provider Connection Steps
Follow these steps to configure and register your Identity Provider:
-
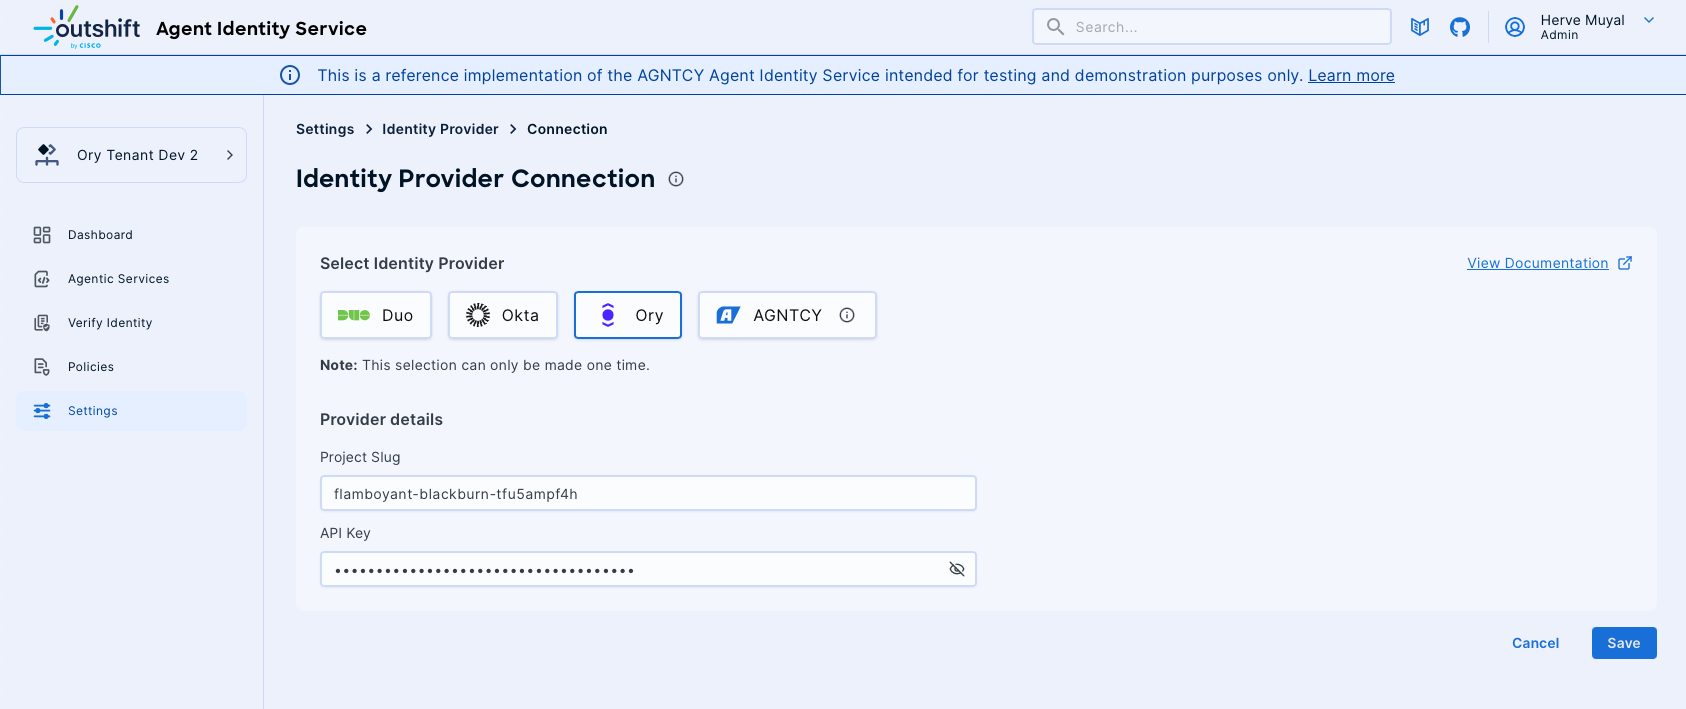
Select Identity Provider:
- On the "Identity Provider Connection" page, you will be presented with a selection of supported Identity Providers.
- Carefully choose the provider you intend to integrate:
- Ory (as shown in the example, for Ory integration)
- Critical Note: The selection of an Identity Provider is a one-time action. Once saved, this choice cannot be modified later. Ensure you select the correct provider before proceeding.
-
Enter Provider Details:
- After selecting your desired Identity Provider (e.g., Ory), the "Provider details" section will become active, prompting you for specific configuration parameters.
- Project Slug: Enter the Ory project slug. This is a unique identifier for your Ory project and can be found in your Ory Console under project settings.
- Example:
mystifying-kapitsa-y0k3j7igbj
- Example:
- API Key: Provide the API Key. This key is used to authenticate requests from AGNTCY Identity Service to Ory and is generated in your Ory Console.
-
Save Configuration:
- Once all required details (Hostname, Integration Key, and Secret Key) have been accurately entered, click the Save button.
- Upon successful saving, your chosen Identity Provider will be registered and configured within AGNTCY Identity Service.
- If you need to discard the entered information and cancel the creation process, click the Cancel button.
Connecting Ping Identity as an Identity Provider
This guide specifically details the process for configuring Ping Identity (PingOne) as an Identity Provider.
Prerequisites
Before you begin the Identity Provider connection process, ensure you have the following:
- Access to AGNTCY Identity Service: You must have an administrator role or sufficient permissions within the AGNTCY Identity Service application to access the Settings and connect Identity Providers.
- PingOne Account: An active PingOne account is required.
- PingOne Application Details: You must have a worker application configured within your PingOne environment. From this application, you will need to retrieve:
- Your PingOne Environment ID
- The Client ID for your worker application
- The Client Secret for your worker application
- The Region where your PingOne environment is hosted (e.g.,
com,eu,asia)
You can follow the PingOne documentation for detailed instructions on how to create and manage worker applications within PingOne.
Worker applications in PingOne are designed for server-to-server authentication using the OAuth 2.0 client credentials grant type, which is ideal for the AGNTCY Identity Service integration.
PingOne Application Configuration
When creating your worker application in PingOne, ensure the following:
- Application Type: Select "Worker" as the application type
- Grant Type: Ensure "Client Credentials" is enabled
- Scopes: Grant the necessary scopes for the application to manage other applications (typically administrative scopes)
- Token Endpoint Authentication Method: Use "Client Secret Basic" or "Client Secret Post"
The AGNTCY Identity Service will use this worker application to create and manage OAuth client credentials for your agentic services automatically.
Identity Provider Connection Steps
Follow these steps to configure and register your Identity Provider:
-
Select Identity Provider:
- On the "Identity Provider Connection" page, you will be presented with a selection of supported Identity Providers.
- Carefully choose the provider you intend to integrate:
- Ping (for Ping Identity PingOne integration)
- Critical Note: The selection of an Identity Provider is a one-time action. Once saved, this choice cannot be modified later. Ensure you select the correct provider before proceeding.
-
Enter Provider Details:
- After selecting your desired Identity Provider (Ping Identity), the "Provider details" section will become active, prompting you for specific configuration parameters.
- Environment ID: Enter the Environment ID from your PingOne console. This uniquely identifies your PingOne environment.
- Example:
abc123-def4-5678-90ab-cdef12345678
- Example:
- Region: Specify the region where your PingOne environment is hosted. Common values are:
comfor North America (https://auth.pingone.com)eufor Europe (https://auth.pingone.eu)com.aufor Australia (https://auth.pingone.com.au)cafor Canada (https://auth.pingone.ca)
- Client ID: Input the Client ID from your worker application. This uniquely identifies your application within PingOne.
- Example:
a1b2c3d4-e5f6-7890-abcd-ef1234567890
- Example:
- Client Secret: Provide the Client Secret from your worker application. This is a sensitive credential used for authenticating API requests. For security purposes, the input in this field will be masked (displayed as asterisks).
-
Save Configuration:
- Once all required details (Environment ID, Region, Client ID, and Client Secret) have been accurately entered, click the Save button.
- Upon successful saving, your Ping Identity provider will be registered and configured within AGNTCY Identity Service.
- If you need to discard the entered information and cancel the creation process, click the Cancel button.